Tuesday 29 June 2021

Hawker Hunter - The Black Arrows

The Black Arrows, one of the predecessors to the current Royal Air Force Aerobatic Team the Red Arrows, were an aerobatic demonstration team formed in 1956 by Squadron Leader Roger L.Topp, then Commanding Officer 111 Squadron (Treble One). One of the many memorable feats accomplished by the Black Arrows was the execution of a world record loop of 22 Hawker Hunters in formation at the Society of British Aircraft Constructors' show at Farnborough in 1958. This was a world record for the greatest number of aircraft looped in formation, and remains unbroken to this day. After the loop the Black Arrows performed the world's first 16 aircraft barrel roll. 

Treble One and the Black Arrows

Although best remembered for the Black Arrows, 111 Squadron's tradition for display flying can be traced back to the Hendon Air Display of 1926, when flying two Armstrong Whitworth Siskins they competed against 17 Squadron's Sopwith Snipes and 23 Squadron's Gloucester Gamecocks (Douglas Bader would be flying with 23 Squadron in the same aircraft in the 1931 display just months prior to his horrendous crash in Bulldog K1676).

In December 1937, Treble One became the first RAF squadron to receive Hawker Hurricanes and made further history on 10 February 1938 when its CO, San Ldr J W Gillan, flew from Edinburgh to RAF Northolt, London, in 48 minutes recording an average speed of 409 mph.

Throughout the Battle of Britain, in the summer of 1940, the squadron flew in almost continuous action, claiming 94 enemy aircraft destroyed. They were re-equipped with Spitfires in July 1941 and relocated to the Mediterranean where they were involved in support of Operation Torch, the invasion of North Africa and Operation Husky, the invasion of Sicily. Treble One then moved on through Italy with the advancing Allied ground forces and remained there until the end of the war, before being disbanded in 1947. 

In 1953, the squadron were reformed at RAF North Weald, equipped with Meteor F.8s, however, any interest in reforming an aerobatic team on the squadron remained informal and while several pilots did indulge in the sport, being unofficial, their events were seldom recorded. When San Ldr Roger Topp took over the squadron in January 1955, he thought it a good idea. Finding the routine of squadron life to be dull, 'to bring back a bit of excitement' he took over the leadership of the Meteor team. The team continued following the squadron's conversion to Hawker Hunters.

The squadron's re-equipment with Hunter F.4s began in June 1955 and hit the headlines again in the following August when Roger Topp established a new Edinburgh to London speed record in 27 minutes 52 seconds at an average speed of 717.5 mph.

In April 1956, the 11 Squadron Hunter team had been nominated as the official aerobatic team of no.11 Group and made its debut at the French National Air Display at Bordeaux on 12 May. It received a great deal of praise for its precision aerobatics prompting one French commentator to refer to them as 'les Fleches Volantes' - 'The Flying Arrows'.

Training for the new season began in January 1957 with the squadron's new Hunter F.6s and with their appointment to the RAF's premier aerobatic team, the squadron was given permission to replace their standard grey/green day fighter camouflage scheme with a special display finish. After experimenting with various paint schemes, an overall gloss black was finally decided on. The colour was chosen for it was the colour of bar makings carried on various of the squadron's aircraft types between 1925 and 1937 and black would make the team highly visible and more impressive. 

Although the team had no official name other than that of the Squadron, it was a remark in a leading French newspaper, Le Figaro, following their appearance at the Paris Salon in June 1957 that referred to them as 'les Fleches Noir' - the Black Arrows - was considered an appropriate, albeit unofficial, name for the team by Roger Topp and quickly adopted. In October 1958, Roget Topp was succeeded as Co and leader of the team by San Ldr Peter Latham, a former member of 263 Squadron aerobatic team which flew in the 1950 Farnborough RAF Display. Following on from Roger Topp was going to be a challenge, but it was Peter Latham who increased the normal display number of aircraft from 5 to the 9 still flown today by  the Red Arrows. 

The Black Arrows marked their final appearance as the RAF's premier aerobatic team at Farnborough in September 1960 following which it stood down in readiness to reequip with the English Electric Lightening. 

The Model

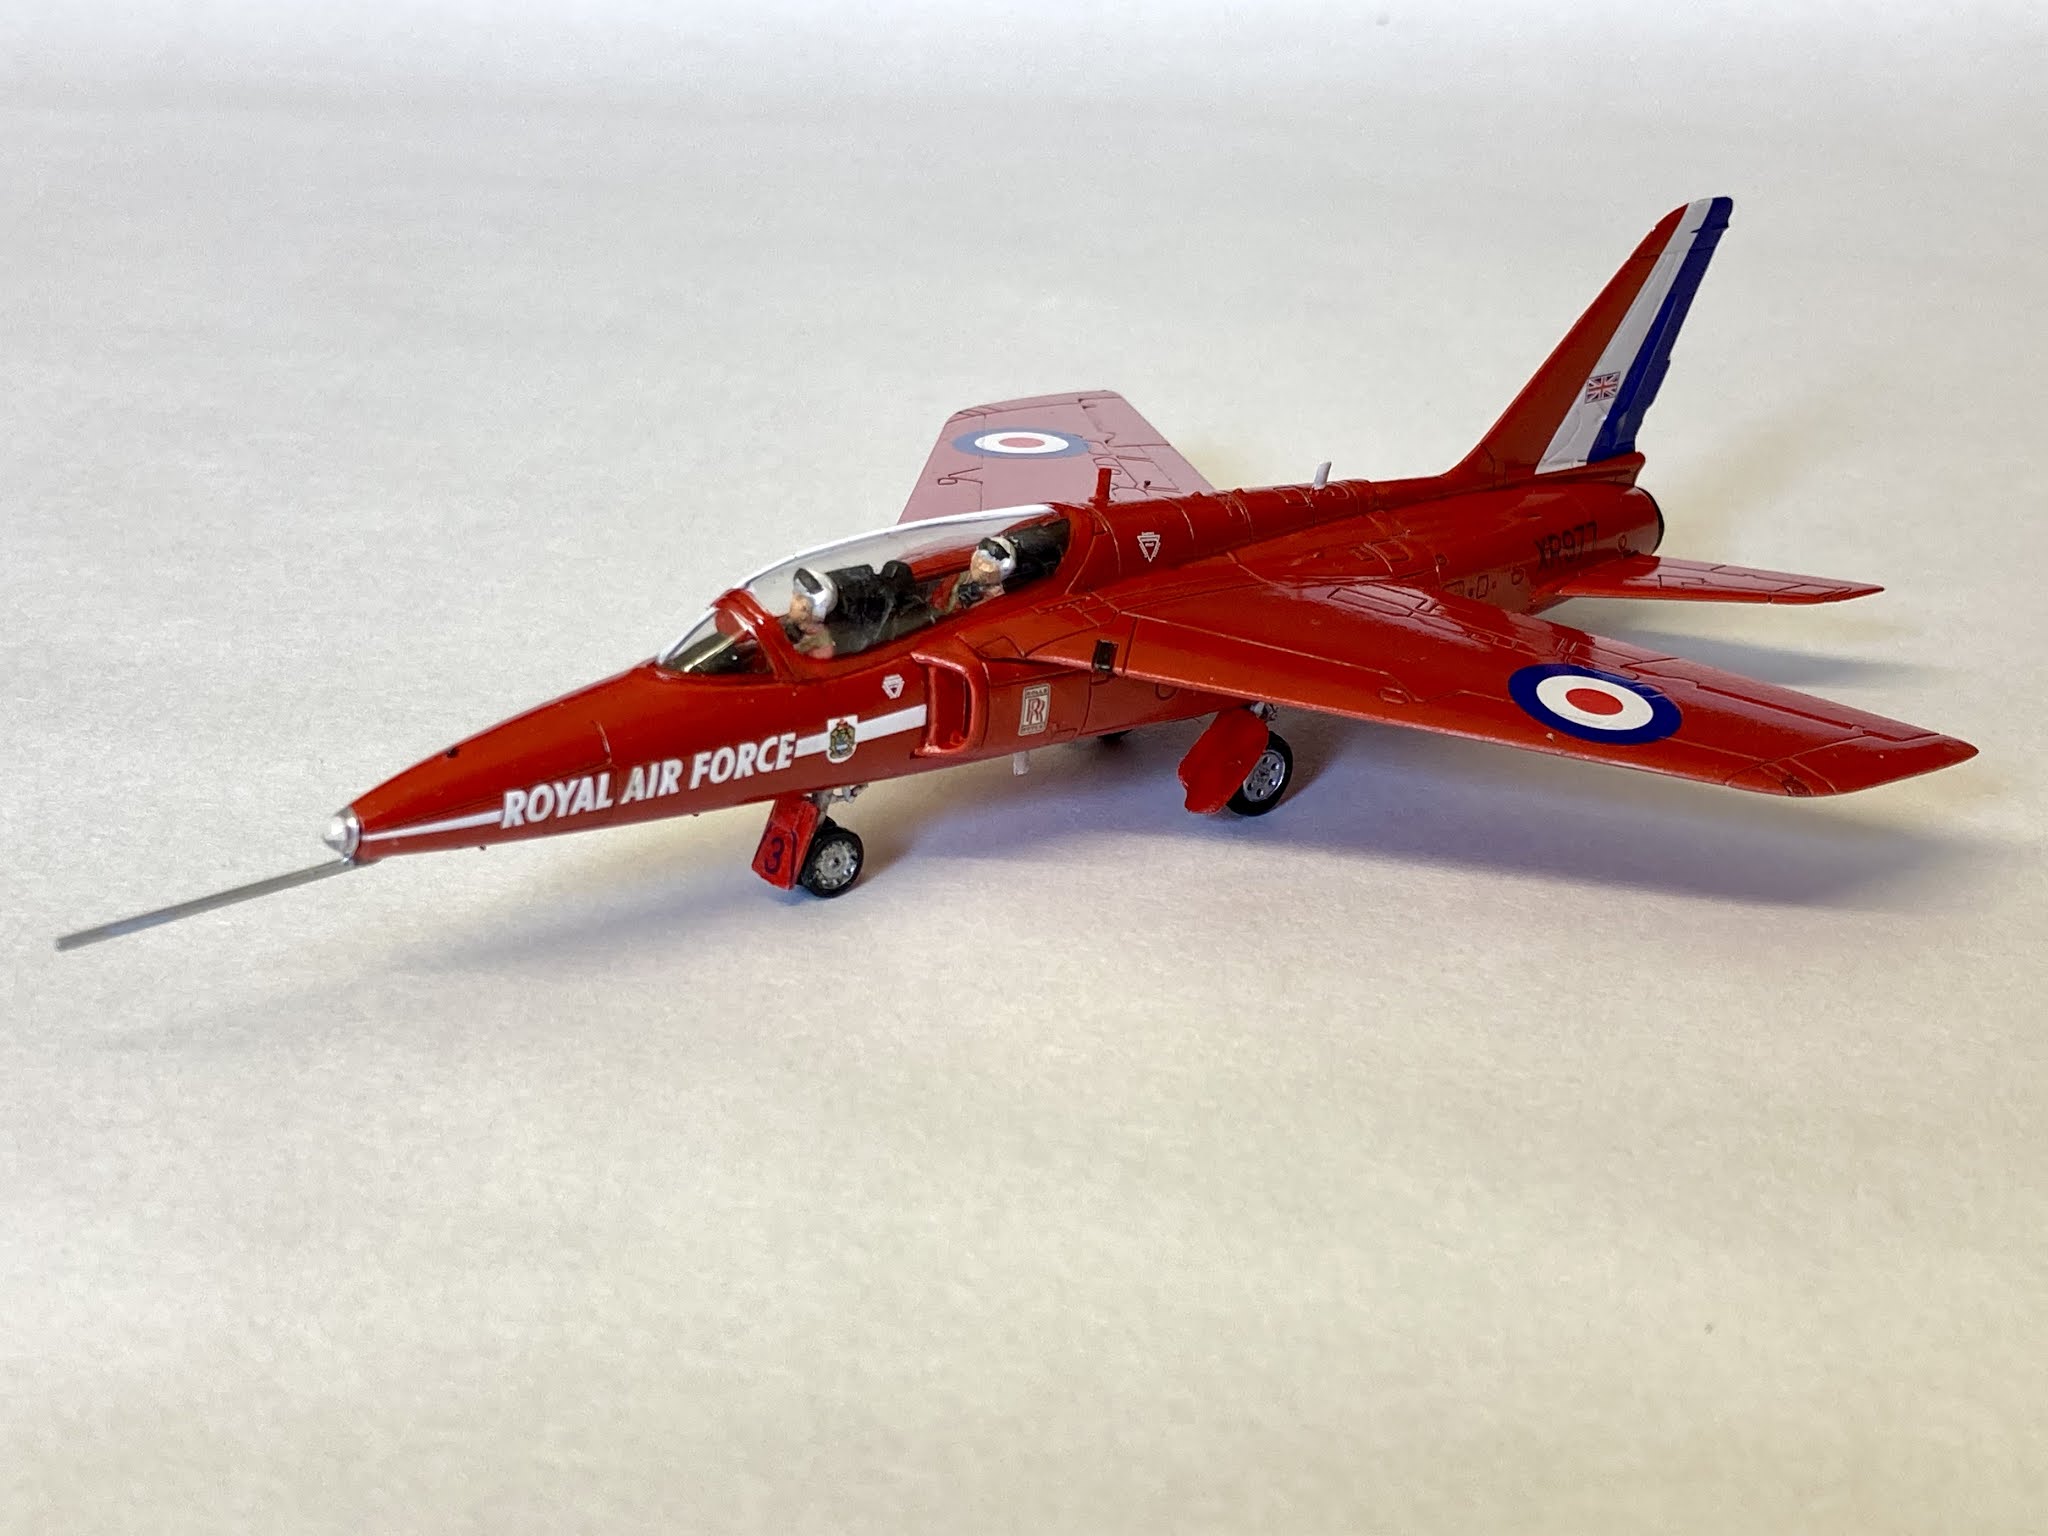
For my model of the Black Arrows I struggled for 1/72 kit at a price which would not limit this serial model maker's ability to make another purchase. Airfix had moved it's Hunter into their 1/48 scale range and Revel's 1/72 kit was, for some reason, going for twice what I was prepared to pay. So a trawl of auction sites brought me an aged 1993 release of Airfix's Hunter FGA9.


The Black Arrows used the Hunter F.6 between 1957-1960. The FGA9 ground-attack fighter replaced the F.6 interceptor version in April 1963 and thus could never have been flown as Black Arrow. However, the visible differences are probably minimal. The FGA9 were all were modified from F.6 airframes to give it  better performance in its ground-attack role. It had strengthened wing to allow for a wider range of stores, 230 gallon inboard drop tanks (which I have left off), a tail chute a bobweight in its pitch control circuit to increase stick force in ground attack manoeuvres and increased oxygen capacity increasing its flying time.

I was also unable to acquire any aftermarket Black Arrows decals, the 1:48 scale model only currently being catered for. Most of the supplied Airfix decals were also unusable, the colour printer was was obviously not properly aligned on the day of production, as colour bleed and overtyping was awful. I therefore, improvised, using an old set of Lightening roundels and tail markings, the latter being a perfect match for the Black Arrows. The roundels would have been better had they had a thin white outline, a design which was added to the full sized aircraft in August 1957. I needed a Union flag for the starboard side of the nose, so cut one I had from a set of unused 1:32 scale Rally Mini Clubman decals and as I had no way of obtaining a 111 squadron badge - while admittedly I could have used another - I did have 2 flag and so applied one to both, and I think the symmetry at least works. The aircraft serial numbers should really have been in red, but having seen other models, may be, incorrectly wearing white numbers, I used the set which came with the kit - the only ones to be correctly printed due to probably being just one colour. 

Just out of interest, I looked up what may have happened to XJ673. It was converted to FGA.9 in 1960 by HSA. Joined 20 Sqn. on 7 September 1961 and was coded ‘XX’ as the OC’s machine. It met its end on 2 April 1969 when it was abandoned whilst on approach to Clark AB, Philippines. It had suffered an engine failure and loss of hydraulic fluid. The pilot, Flt. Lt. K.R. Barley, ejected safely.


The Kit

Brand: Airfix
Title: Hawker Hunter FGA.9
Number: 02073
Scale: 1:72
Type: Full kit
Released: 1994 | Rebox (Changed decals)

Friday 25 June 2021

Folland Gnat - The Red Arrows

Prior to 1965, it had been the practice to provide official RAF acrobatic teams from existing squadrons, however, with the increasing sophistication and cost of fighter aircraft, together with the disruption to other activities, this became a tradition that the treasury saw as an unnecessary diversion of valuable resources.


It was decided, therefore, to form the first permanent display team known as the Royal Airforce Aerobatic Team administered by the Central Flying School at Little Rissington. After much deliberation and following the successful demonstrations by the Yellowjacks the previous year, the Folland Gnat was selected, being the most suitable aircraft available.


The official name chosen for the new team was the Red ArrowsRed to retain its links with the CFS display team - The Red Pelicans; while Arrows would not only be representative of the Gnat aircraft’s profile, it would also hark back to the famous Black Arrows Hunter team of 111 Squadron a few years earlier.


.

For my Red Arrow build, I used the 1:76 scale Red Arrows Gnat starter kit first released by Airfix in 2012. This uses the same tooling as on their later T.1 and Yellowjacks releases. As with my last  Yellowjack creation, I decided not to fit the underwing 'slipper' tanks as these were not usually carried during display flying. Otherwise it was an out of the box build in which I even used the Humbrol supplied Post Office red paint. 

The decals and paint scheme provided with this kit, reflect that which would have been seen during  the Gnats’ final 1979 season: with the full-chord red white and blue tail fins, first applied in 1967 to replace the standard RAF tail fin flash, and the words Royal Air Force and CSF badge within a white stripe on its nose. The latter marking was added for this final season, replacing the white lightening stripes they had worn for the previous 10 years. This final change, as confirmed by Flt Lt Bob Lewis, the team's Engineering Officer 1977-1980, was brought about following the arrival of privately sponsored teams, such as the Rothmans Pitts Specials, and rumours suggesting the possible sponsorship of the nine little jets. To dispel any doubts that the Red Arrows were not for sale, the MOD decided the words Royal Air Force should be emblazoned on the fuselage.   


The last public of the season were given at the Battle of Britain shows at Abingdon and St Athan on 15 September 1979, following which, the Gnat team gave their final performance at RAF Valley. Since their formation in March 1965 The Red Arrows Gnats had completed a total of 1,292 displays and visited 18 countries.  

….

The kit

Brand: Airfix
Title: RAF Red Arrows Gnat Starter set
Number: A55105 
Scale: 1:72 
Type: Full kit Released:2012 | Rebox (Changed box only)


.

Sunday 20 June 2021

Hunting Percival Jet Provost T.4 - The Red Pelicans

The highly successful Jet Provost provided the RAF with a training solution for over 30 years. During this period many RAF stations operated aerobatic display teams and the Central Flying School's 'Red Pelicans' were amongst the most distinctive, often flying in the same programme as the Red Arrows.

In 1957, when the Jet Provost entered service, there were 29 air display teams representing their respective RAF squadrons, flying such aircraft as the de Havilland Chipmunk, Vampire and Venom, English Electric Canberra, Hawker Hunter, Gloucester Meteor, and now the Hunting Percival Jet Provost. There was no single official RAF team and their shows covered a standard 'Box' display, so as to best show off their formation flying skills, though unlike those pioneers of the 1930s, they did not go as far as to connect their wingtips with lengths of rubber cord! 

CFS The Red Pelicans XN468, RAF Little Rissington, Gloucestershire, 1966

The RAF's Central Flying School (CFS) received its first Jet Provost T.1 in November 1957. AOC-in-C RAF Flying Training Command, Air Marshal Sir Richard Atcherley, requested the CFS form a team with these jets and appear at the 1958 Farnborough Air Display. 

Norman Giffin, who was selected as leader of the CFS's first Jet Provost team, initially had five of his aircraft painted in a red and white scheme to emphasis the difference between the top and bottom surfaces. This was in anticipation of being able to do part of the display inverted.  The T.1 was, however, not ideal for display flying, being underpowered for formation aerobatics thus limited the team's early routines, and disappointingly also made inverted display impractical!

The team wanted to call themselves 'The Red Pelicans' but as the Meteor team of previous years had ambitions to continue into 1958 and were already using the name 'Pelicans', they had to settle for the rather uninspiring name - 'The CFS Jet Aerobatic Team'.


Airfix's 1:72 Hunting Percival Jet Provost T.4 in the Signal Red colour of The Red Pelicans 1966

In July 1959 the first batch of the more powerful Jet Provost T.3s were received and the team of four jets developed a show where, in addition to the standard 'Box Four' display, they would split into two pairs to carry out synchronised, mirror image manoeuvres; very different to what other teams were doing.

In March 1962, the number of display aircraft was increased to five and the team became the first to operate the newly-delivered Jet Provost T.4. This season also marked the occasion that would have greatly pleased Norman Giffin 5 years earlier, when the team, now lead by Flt Lt Ian ' Snowy' McKee, was finally allowed to be renamed 'The Red Pelicans'.

In 1963 The Red Pelicans was nominated as the official RAF aerobatic team. A sixth aircraft was added to the CFS team, which were repainted in a new all-over day-go red colour scheme. The Red Pelicans were the first teams to ever have put on a display rolling six aircraft in line abrest. by the end of the season, the Air Ministry eventually decided that the English Electric Lightening fighters, which at the time formed the Fighter Command's display team, were totally unsuitable for the type of aerobatics that an aid display now demanded  and so, The Red Pelicans was then nominated as the RAF's premier aerobatic team for 1964.

Head to Head - The Red Pelicans, Yellowjacks and Red Arrows

At the Farnborough Airshow in September of 1964, The Red Pelicans gave a series of synchronised displays with the RAF's first team of Folland Gnat aircraft - the 'Yellowjacks' from No.4 Flying Training School (FTS) RAF Valley. The success of the swept wing manoeuvrability and increased performance of the Yellowjack's Gnat, lead to the subsequent formation of the RAF Aerobatic Team - 'The Red Arrows' - in 1965 and the stepping down of The Red Pelicans as the premier team.

Although The Red Arrows had replaced the Jet Provost team, four enthusiastic volunteers, led by Flt Lt Bill Langworthy, convinced the authorities of the need to maintain a second team. While officially approved to fly the 1965 season, the team of four were denied the use of the Red Pelicans title and thus were called 'The 1965 CFS Jet Provost Aerobatic Team'. Common sense and the Red Pelican title was restored for the 1966 and subsequent seasons.


In 1966 The Red Pelicans receive delivery of a batch of new Jet Provosts finished in a new Signal Red colour scheme, a look they would keep for the next 4 years. 

When the new pressurised Jet Provost T.5 came into service in 1969, and The Red Pelicans received their aircraft in preparation for the 1970 season, they were in the standard training colour scheme of red, white and grey. The only concession allowed to the team was the addition of a Pelican motif in red on the fin and The Red Pelican title on the rear of their fuselage.

The Red Pelicans continued to perform with their JP.5s through to the final show of 1973 season at Linkenheim near Karlsruhe, Germany on 23 September 1973, following which they were disbanded as part of the Government's economy measures. 


For my build, I managed to get hold of Airfix's current starter kit of the The Red Pelicans'  Jet Provost   from 1966, when they changed  to the Signal Red colour scheme, the same colour as used by the Gnat Red Arrows

------

The model kit ..


Brand: Airfix
Title: Hunting Percival Jet Provost T.4 Starter Se
Number: A55116
Scale: 1:72
Type: Full kit
Released: 2017 | Rebox (Model set)


Monday 14 June 2021

Folland Gnat - Yellowjack

The Yellowjacks were the Royal Air Force aerobatic display team which flew Folland Gnat trainers painted yellow. 

The team was formed informally in the summer of 1963 by a group of flying instructors, led by Flight Lieutenant Lee Jones, at No 4 Flying Training School at RAF Valley, whose call sign was "Yellowjack". 

Yellowjack parked up at the airfield

I would normally go out of my way to select decals to match the actual aircraft used, but in this instance, apart from using a larger set of wing roundels from my stash, as were used by the Yellowjacks, I used the Airfix RAF Valley decals supplied with the kit. 

The Airfix Folland Gnat with a different paint job 

I think, with hindsight, I overdid the panel lines, but it was all the ‘weathering’ I was going to do and I wanted to add some detail for the eye. 


-----------------

The model kit ...

Brand: Airfix
Title: Folland Gnat T.1
Number: A02105
Scale: 1:72
Released: 2018 | Rebox (Changed decals)

Tuesday 8 June 2021

Messerschmitt Bf109E

My first Luftwaffe aircraft in ages. This is the Airfix 1:72 scale Messerschmitt BF109E-4 (1538) as flown by Oberleutnant Anton Schon with 8 Staffel Jagdgeschwader 54 (8/JG54), Luftwaffe in 1940

I had a real challenge with both the masking and airbrush on this build

At the age of 28, Anton was  KIA on 27 September, 1940 over Tilbury-Kent  while trying to put his crippled 109E fighter down, when he hit a fence, somersaulted over main road and crashed in flames near Brenley House, Boughton, near Canterbury, Kent, 12.05pm.

I loved the number of different decals included with this kit
 

He was buried at Boughton under Blean churchyard, and later moved to the War Cemetery at Cannock Chase, Block 1, Gr 177.


The detailing Airfix have thrown in is really impressive compared to an Me109
I have in my collection from 10 years ago.

Prior to his death, he had already he survived a mid-air collision on 15 November, 1939 over Lingen/Ems and on 12 August, 1940 being wounded over the Guines-South airfield in NE France c. 10.5 km S of Calais and 1 km SW of the village of Guînes when his aircraft sustained 60% damage. The airfield served as a forward Luftwaffe fighter field in 1940, abandoned after the Battle of Britain.It was on this same date that he recorded his first victory, a Spitfire at Ramsgate. One of the first fighter pilots to receive the EK 2 (Iron Cross 2nd Class).


----------

The Kit ....


Brand: Airfix
Title: Messerschmitt Bf109E-4
Number: A01008A
Scale: 1:72
Released: 2018 | Rebox (Changed decals)

Hurricane Mk.1 (Paul Richey)

My second Hurricane in as many months is, Paul Richey’s ‘Phoney War’ Hurricane Mk1. This is a very nice and simple build, after the efforts on Pegasus Bridge, of an excellently produced 1:72 Airfix kit. It's the same kit I used as part of my Douglas Bader tribute. While that one was slightly ruined by me using AMMO of MIG Jimenez's version of RAF paints, where the green was far too bright, for Richey's Hurricane I invested in a set of Hataka's paints which look so much better!

1:72 Airfix Hurricane Mk.1

Flying Officer Paul HM Richey, is also the author of ‘Fighter Pilot’, a must read classic book of what it was like to be a fighter pilot in the war. Before he was wounded on 19 May 1940, Paul Richey had claimed ten victories, and later returned to operations in 1941, ending the war as a Wing Commander.


Note in the pictures the small roundels both on wings and fuselage. Originally these would have had a yellow outer ring which were painted out. The yellow returned to the fuselage roundel for the Battle of Britain while on the wings the red and blue were extended to fill the gap left by the yellow ring which was not replaced.


The two bladed propeller on the first Hurricanes was a throwback to the biplanes which it replaced and was made of wood. These had a tendency, as Richey discovered, to self destruct in the air when pushed to limits never dreamed of when first designed for the early biplanes. They were soon replaced with metal three bladed propellers. 


Also taken from the early RAF biplanes is the full red white and blue stripes covering the tail rudder. these too were soon replaced with the more familiar boxed version positioned in front of the rudder.

Can you notice the contrasting wear added around the gun access panels?

For this build, I went slightly against the Airfix plans and left the squadron markings and serial numbers off the aircraft, so as to show Richey's aeroplane as it appeared in mid 1940. I also attempted a different weathering approach on this kit. I kept it light but wonder if you notice the contrasting wear I've added around the gun access panels?

One may just make out the black under paint on the tail 

No.1 squadron were innovative in looking at markings and camouflage on their aircraft, also being instrumental in the overpainting of their earlier black and white underside, a look I also decided to go with and one which was later adopted by all British aircraft by the time of the Battle of Britain. 

-----------

The kit ...


Brand: Airfix
Title: Hawker Hurricane Mk.I
Number: A01010A
Scale: 1:72
Released: 2020 | Rebox (Changed decals)

Saturday 5 June 2021

Pegasus Bridge Video

 Video of my Pegasus Bridge 1:72 scale diorama filmed with the soundtrack from the 1970s classic film “The Longest Day”

1:72 Scale diorama of Pegasus Bridge on D-Day 6th June 1944

Pegasus Bridge

I bought Italeri's amazing Pegasus Bridge kit some 12 moths ago with a view to building it into a diorama in time for a 6th June, D-Day anniversary release. Having retired in April this year, I thought what a perfect time to make a start, little did I appreciate how close to the wire it would get! 

The diorama ended up taking up 25% of a large repurposed Scalextric baseboard which I have been using since mid last year to showcase some of my model builds. After constructing and painting the bridge itself, all made from laser cut wood - the smell of which filled my loft space workshop - the challenge was with way to orientate it. 


The Orientation of the Bridge

My original plan was to have the Café Gondrée, the small coffeehouse located on the west bank of the Caen Canal, at the northwest end of the Bénouville Bridge, now commonly referred to as the Pegasus Bridge and the glider on the southwest of the picture. Based on this design, I set about cutting out the canal, making it full width to accommodate the bridge then narrowing it to accommodate the glider. Meanwhile, my idea was to use the east of the remaining board for a later D-Day landing diorama. 

My plan, however, started to unravel when I both totally underestimated the space required for the glider and was, in any case, having issues in sourcing a decent enough model which could play the part of the Café; the only reason for positioning the diorama in this way.

The view I originally intended to have

The view I finally settled on

Finally, after rotating the bridge through 180 degrees, it was clear that I preferred both the view this offered of the bridge and the space now available to the glider in the north east corner of the board. This unfortunately meant that I had not only lost the option to use this space for that later D-Day landing diorama, but I had also cut the canal too short! I could, in truth, have extended the canal to the east, but having spent hours to line, seal and edge the original cutout, I settled on making do with what I had. 

The final view

Adding Water to the Canal

The reason I had to line and seal the cutout was to ensure when I added the water effect, it didn't all seep out through the layers of cardboard. Although the seal held firm, the space still required 1.5l of Woodland Scenics Realistic Water, which, at a cost of £25 per 500ml of fluid, I was very glad I had not gone and extended the canal! I'm still a real novice at water effects and learned loads on this one. 

While not easy to see from the pictures, the process went as follows: I coloured the bottom of the cutout with a mottled blend of brown, green and blue acrylic paint. On applying the first layer of water, and there were 4 layers applied in all, the small ripples in plastic sheeting used to seal the cutting seem to get enhanced and annoyingly rose above the water level. The second layer of fluid then reacted badly with the first, creating its own ripples. I've no clear idea why this happened and can only think that it was because the first layer had not cured sufficiently. I later learned that to cure, the Realistic Water requires a temperature of above 20 degrees and we were going through a cold snap, made worse by the diorama being in the attic! 


For the third layer, after removing the unusable sludge, I added a little grey and blue paint to some of the water to provide a better feeling of depth, and to hide some of the damage I had left in removing the old. In adding the paint, I made my second mistake in shaking the bottle. In addition to the 20 degree rule, the instructions also stated "do not shake". This third layer of water thus had small bubbles added, which while I was able to pop all the larger ones with a cocktail stick, left areas of aerated water, not a look I was after! The forth later of unshaken coloured water, however, sealed these bubbles beneath the surface and with hindsight, I think add a further element of both interest and depth. The sun had also come out and the loft space was now at the perfect temperature for very rapid curing, leaving me with a smooth and very realistic look of water. 


While on the subject of water, I also added one of my poor German figures splashing head first into the canal together with a few bullet splashes. The water rising up around the soldier was crated by soaking cottonwool in the Realistic Water and then applying it to the surface of the hardening water and the bullet splashes were teased up at the same time using a cocktail stick. The final effect of adding the last layer of water, once this had all cured, I think made this look even more realistic. 

The 6 Scenes

In addition to the centrepiece of the bridge itself, there are 6 clear scenes unfolding in this diorama which I will take you through in chronological order for June 1944. 

1. French Resistance

Within 24 hours of D-Day, the BBC broadcast prearranged coded messages to the French Resistance to disrupt occupying German forces' transport and communication lines. 


In the southeast corner of my diorama I have a small unit of Resistance med and women bringing down telephone wires to prevent the German troops at the bridge from calling on reinforcements. The wire, which you may just be able to see, is made of nylon thread and the explosion effects are made from painted cottonwool.


2. The Glider Landings

Six Airspeed Horsa gliders, piloted by 12 NCOs from 'C' Squadron, Glider Pilot Regiment, towed by Halifax bombers took off from RAF Tarrant Rushto, east of Blandford Forum in Dorset. Major John Howard and second in command Captain Brian Priday, leading 'D' Company, 2nd (Airborne) Battalion, Oxfordshire and Buckinghamshire Light Infantry, had the mission to seize the bridges over the River Orne and Caen Canal at Bénouville and Ranville intact and hold them until relieved. 

Italeri's 1:72 Scale Horsa Glider crashed into barbed wire  

My diorama is intended to show, Major John Howard's number one glider, which had Staff Sergeant Jim Wallwork at the controls, crashed into the barbed wire surrounding the canal bridge defences at 00:16 on 6th June 1944.

For the model of the Horsa Glider I used Italeri's 1:72 scale kit which was a lengthy and interesting build in itself. For speed, and as this was not going to be a display piece, I decided to use the decals of the D-Day black and white stripes rather than masking and painting them in as I would normally do, and likewise I sprayed the camouflage pattern freehand rather than masking, as no one was going to be getting up close to inspect this model. 

Italeri provide some nicely crafted figures to accompany the glider kit

I would have liked to have left the tail broken away from the body, as they are apparently intended to do to facilitate a speedy exit from the glider, but as it was number 2 glider and not this one which broke up on landing, I went with the doors open view instead. With hindsight, I wish I'd gone with the tail off configuration as I only intended this diorama to give a feel for the event, rather than be an accurate interpretation. 

3. The Canal Bridge Defences 

Surrounding the canal bridge were trench defences and a gun emplacement. I constructed the trench by cutting out a channel in the card base and affixing pieces of painted toothpicks to the sides to replicate the trench being shored up with logs of wood.

Trench and 'large' anti-tank gun emplacement

The gun emplacement was cut from leftover wood from the Pegasus Bridge kit, and while the gun itself should have been a much smaller version, it looked so lost in the possibly oversized emplacement I built, that I dug out and repainted an old 88mm anti tank gun I had stashed away, which much better fitted scene. 

Canal Bridge Defences 

4. The Artillery Park

There is no evidence that I can find that there was ever an Artillery Park at Pegasus Bridge, but the kit provided a sign to one together with 3 pieces of artillery which had to be placed somewhere!

There was however, a pillbox, for which I added a couple from my stash together with a barrier which actually came with Italeri's Vietnam War set I made last year, but did not really fit in. I think that just as with my Artillery Park sign, Italeri throw in random bits they have for dioramas just to complete their kits.


Within this Artillery Park scene, I've used oil barrels and boxes which cane with the set, sandbags again from the Vietnam War kit, an Airfix German jeep, barbed wire made of binding found on an old paper pad 


and the random artillery pieces provided, with the bridge. I also don't know whether there were any mines planted around the bridge, but I was on a roll with my sign production so it does have mines in my diorama! 

5. Panzer Park

There is much written about how after the disastrous performance of the German Army on the Eastern Front in 1942 resulted in Hitler retained personal command of the Panzer devisions and then how on D-Day, no one would wake him to request their release now once he woke would anyone bring up the subject, because he was in a foul mood! Finally, by 4pm on 6th June, having earlier dismissed the landings as a feint, Hitler released two divisions of Panzer Group West, the 12th SS and Panzer Lehr, for deployment to the coast. While they played no part in preventing any Allied troops landing in Normandy,  by the 7th June, they were at Caen, to participate in the defence of the town, action which severely held up the Allied's advance. 


For my diorama, I thought I'd construct a small tank park with examples of some of the armour used in the campaign and all freshly painted in their Normandy tiger striped camouflage! 


The models are a set of Airfix classics while the motorcycle was a late addition from Italeri's German Motorcycle set.

6. Arrival of Lord Lovat's Commandos

While first company of the 7th Parachute Battalion, commanded by Major Nigel Taylor, made there way to the bridges in the early morning, it is the arrival of Lord Lovat's Commandos from Sword Beach that marks the moment in history when Major John Howard and his glider troops were officially relieved.

It was at 13:30 on 6th June, that the men at the bridges heard the sound of bagpipes, played by Lord Lovat's piper, Bill Millin of No. 4 Commando, 1st Special Service Brigade. As the commandos arrived, they crossed the bridges and joined the rest of 6th Airborne Division defending the eastern perimeter. Some of the tanks accompanying the commandos moved into Bénouville to reinforce its defences, while others crossed the bridges with the commandos.


Airfix do not provide a piper in their British Infantry figures, so I had to make one. I also used on or my French Resistance figures to portray Lord Lovat, as he was known to wear an Aran jumper over his battle dress and there was the perfect figure in Caesar Miniatures box of Partisans.


The Video

One of my all time favourite films has to be 'The Longest Day' and so having built the bridge and related models, I just had to make a quick video using soundbites from the classic film to tell the story of the day. I hope you enjoy it!


....

The Model Kits


Brand: Italeri
Title: D-Day 75°Ann.1944-2019 Pegasus Bridge - Airborne Assault Battle set
Number: 6194
Scale: 1:72
Type: Multi-kit
Released: 2019 | Rebox (Model set)

Brand: Italeri
Title: AS.51 Horsa Mk.I with British Paratroops D-Day Normandy 1944 2014
Number: 1356
Scale: 1:72
Type: Full kit
Released: 2014 | Rebox (Updated/New parts)

Ice Cold In Alex "Katy"

My third Airfix Austin K2 Ambulance build, I just love this kit. This one is inspired by the 1950s classic book and film “Ice Cold In Alex”....