Showing posts with label German. Show all posts

Tuesday, 12 March 2024

Me 410 (Commission)

Next up is an Airfix’s 1/72 Messerschmitt Me 410 commission for a collector customer of mine. 

Need to decide whether to build the U2 or U4 version. It’s the U2 which is to be found at the RAF Museum Midlands (Cosford) and which was LIDAR scanned by Airfix for the outline accuracy of this kit. 


Slow but positive progress made this afternoon on the Me410. I’m now at stage 14/77 of the Airfix instructions. This isn’t a quick or simple build, that’s for sure. 

I’ve completed the build of the front cockpit tub and rear crew member’s station. Airfix provide split instrument panel decals but the moulding is so raised that getting these to stick I feel would be close to impossible. Also, the decals are predominantly black, which would never been seen with a few white blobs which would be very easy to add with a brush. The decals were thus discarded. Further research showed that some of the buttons may have even been red and so, for added  interest, I included these too. Before I close the canopy, I will also attempt to add a scratch built harness which it would have made more sense for Airfix to have provided in place of the instrument decals.


I’m now just waiting for the inner bulkhead Graublau paint to cure before fitting the cockpit and fuselage together. The rear crew member’s seat is being left to the very last moment to install as I understand if it’s not positioned correctly it will foul the cockpit decking. 

Harness made and fitted, and cockpit installed within the fuselage. 


Back on the 1/72 scale Airfix Me410 and time to add the rear pod and the wings to the fuselage. 
I read that these fit well which in some ways the do, but I can’t help thinking that a jig wouldn’t go a miss to get everything aligned. In the absence of a jig I’ve resulted to trussing it up with tape. 

I’m just praying that once it hardens off it looks as good as it did when first dry fit. 


The removal of the bracing revealed some remedial realignment of the wings and nothing a bit of filler and sanding won’t cure. 

This afternoon’s activity involved the fitting of the rear seat and engine nacelles. 

This is certainly a very detailed and weighty kit. The odd gap here and there between joining surfaces is a little annoying but it’s all part of the hobby and I’ve seen worse.


Flaps & guns fitted and masking removed from gunners window. 

This Airfix Me 410 is not a quick & easy nor a relaxing build. I’m just hoping the details show through in the end to make all the effort worthwhile.


I hate this Airfix Me410 canopy! 🤦‍♂️

It comes in 4 pieces reminiscent of the old Airfix Storch that some may remember. 

The instructions suggest pre constructing it off the aircraft but again, I found that a jig would have been useful here as it needs some form of support. I’ve seen it recommended that one fixes the sides and then the section including screen and top, which is what I’ve attempted. 

Having done such a detailed job on the interior, I really want this canopy to look great, but Airfix continue to conspire against me with this kit. I even found the sprue attaches too close to the glazing such that even with a clean cut and gentle sanding I still see marks in the canopy. I’m hoping the frame will hide these once painted! 

I so want to love this kit but in truth I’m having more of a love hate relationship with it!


I wasn’t at all happy leaving it as is, so I’ve removed the Airfix Me410’s canopy and re-glued it off the aircraft. 


I’m hoping, once it’s  dried off, that it holds together sufficiently for me to coat it in Klear which, fingers crossed, will both give it strength and clean up the sprue damaged glazing. It didn't - replacement requested from Airfix. 

The replacement canopy sprue for my Messerschmitt Me410 has arrived from Airfix. 

Just check out that sprue though … look at all the tabs to remove! Each one presents the scale modeller with the risk of shattering or scarring the fragile and brittle clear parts. What were you thinking Airfix design team?


04-Mar: Back from the Peterborough Scale Model Show and I could not put off checking in on my Airfix Me410 canopy which Id left glueing to the fuselage before the weekend. 

The fitting to the fuselage looks strong and close which is good, but look closely and you’ll see a gap in one of the top joins 😩


Fear not though, a small brush of clear glue and a bit of tape should see this closed.

My copy of Airfix Model World Magazine has just landed and look what’s the subject of this month’s 'In Focus article'!


There’s no putting it off … time to get back to the Airfix Me410!

The canopy of finally in position and it’s time to mask and prime. 


I don’t usually buy canopy masks but felt it essential for the greenhouse glazing on this Me410.

I really didn’t think this day would ever arrive!


That’s the camouflage added. RLM 76 Lichtblau to the underside, RLM 75 Grauviolett to the lower sides, RLM 74 Graugrun and RLM 70 Schwartzgrun disruptive patter to the wings and mottling on tail and sides. 

Next up I’ll probably start applying the decals and then the fiddly bits as there are 63 of them and having a clear line of sight will be beneficial !


Decals applied and now time to prepare the bits and bobs to complete the build. I did have a few scares in applying the decals: firstly,  the white fuselage band broke up, but that was OK as they are always made of too thin a decal such that the paint beneath is usually all to visible. A quick bit of masking and a spray of white sorted this. Then I ridiculously lost a couple of the red dotted "no walk" lines for the upper wing surface. I'm hoping my random spacing hides this error and it can be assumed the aircraft has had a panel repair where the camouflage has been applied but not the line. Finally, the spiral decal for the propeller  spinners just would not lie flat on the rounded surface ... more on this later!

The first of the bits and bobs are the undercarriage struts and exhausts. These now need to harden before fitting the wheels and more fiddly bits as the struts, for one, are notoriously fragile! I did, however, think I'd have a go at the kill markings on the 50mm canon, an addition my customer had specifically requested. 


Having done a not too bad a job on this, I thought why not now try paining the white spiral on the spinner? As eluded to earlier, Airfix did provide a decal for this, but despite a bucket of softener it failed to lay flat and became so puckered that I thought I'd bin them and just go with a painted white cap to the spinners as I've also seen evidence of the Me 410 using. I don't, on reflection think this turned out that bad either. 


7 weeks after starting this kit, the longest build I think I've ever done, and the Me410 is complete!




Friday, 15 December 2023

German STAFF CAR Type 170V

 Having a break from my Seaton Scale Modellers group build, so that I don’t finish it too early! 

I thought, during this interlude, I’d revisit a WW2 Generals project that I kicked off earlier in the year by building the MiniArt Mercedes Type 170V Cabriolet B German Staff Car.

I acquired this MiniArt Mercedes Staff Car some months ago as part of a 1:35 scale WW2 Generals project. The subject for this build is none other than Erich von Manstein and having been one of the generals to launch the Barbarossa campaign, I decided on an early Eastern Front scheme of dark yellow and green, understanding the brown in the box art camouflage was a later addition. 

The Master Box Models General figure built very nicely and I think the addition of 3D-Gizmo’s seated officer adds to the scene of open door and bonnet so as to expose some of the great detailing in this kit.

Erich von Manstein was the military strategist who devised the 1940 plan to invade France through the Ardennes bypassing the Maginot Line to cut off the French and Allied armies in Belgium and Flanders. For his mastery he was promoted to the rank of general and given command of the 11th Army for the 1941 invasion of the Soviet Union. Early victories and the capture of Sevastopol in July 1942 saw him promoted to field marshal, however, although avoiding being implicated in the assassination attempt through illness, disagreements with Hitler over the conduct of the war following the disastrous battles for Leningrad, Kursk and Dnieper, he was dismissed from his command in March 1944.


Taken prisoner by the British in August 1945, he was tried for war crimes and convicted for the poor treatment of prisoners and failing to protect civilian lives. He served just four years before being released in 1953. In his 1973 obituary it was said "He assisted in the march to catastrophe—misled by a blind sense of duty."


-------------------

The Kit

Brand: MiniArt
Title: German STAFF CAR Type 170V Cabriolet B
Number: 35107
Scale: 1:35
Type: Full kit
Released: 2012 New parts


Wednesday, 23 August 2023

Train Busters - Hawker Tempest

This is the 2022 tooled Aifix kit A02109 - Hawker Tempest Mk.V which I’ve finished in the colours of JN751/R-B, the aircraft flown by Wing Commander Roland Prosper ‘Bee’ Beamont, when in command of No.150 Wing, Newchurch, Kent in June 1944 and the 1982 tooled and re-released in 2021 Revell 1:87 scale Schnellzuglokomotive, heavy express locomotive, BR 01 & Tender 2'2' T32.

The inspiration for this “dogfight double” was the picture “Train Busters - Hawker Tempest” painted by Roger H. Middlebrook which I came across while researching the idea of another train v fighter project I still have in plan! Having both the Revell and Airfix kit in my stash, it was just great fun being able to bring the two together. 

A bit of history:

Wing Commander Roland Beamont seems to have been a true British hero. He passed out as a pilot officer on 21st October 1939, flew Hurricanes of No.87 Sqn in France as part of the British Expeditionary Force and earned status of ‘ace’ during the Battle of Britain. He become part of Britain’s fledgling nightfighter force and at the end of his tour of duty took up a position as a production test pilot with the Hawker company. In July 1942, he returned to operational flying with No.56 Sqn and then given command of No.609 Squadron, both units operating the Typhoon. In 1943 he was charged with forming the RAF’s first Tempest Wing (No.150 Wing), used extensively in a home defence role and particularly in combating the V-1 ‘Doodlebug’ threat.


By 12 October 1944 Beamont’s second tour was completed and his replacement had already arrived. Unfortunately, 'Bee' was determined to complete one last sortie. At 1455 hrs he took off from the Wing’s post D-Day base at Volkel in Holland at the head of eight No. 3 Sqn Tempests, and in the Rheine area a stationary train was spotted. With little, if any, flak apparent, ‘Bee’ led them in one and then a second attack, and, totally out of character, and out of ammunition himself, he went on to lead the Tempests back in for a third time. His Tempest EJ710/JF-L (Beamont's own 'RB' aircraft - as I have depicted in my little vignette - was under repair) was hit in the radiator, and 'Bee' was forced to put down well inside enemy territory. Soon captured, he spent the rest of the war as a PoW. 

“Train Busters - Hawker Tempest” painted by Roger H. Middlebrook

Post War, “Bee” retuned to the role of Test Pilot with first flights of the Canberra, lightening, TSR2 and Tornado MRCA to his credit.


The Kits:


Friday, 6 January 2023

SS-100 Gigant Transporter & V2

Revell’s SS-100 Gigant Transporter & V2 and 1/72 Special Armour’s A-StoManhänger "Liquid Oxygen Tank for V2 Rocket" mounted with a few British and German figures for effect. I acquired this unusual selection of kits from fellow modelling club member, Roy last year and it’s been really rewarding to complete something a little different. 


I’ve built and finished these complementary kits to reflect a moment during October 1945 when a total of 3 V-2 rockets were launched from a test site at Cuxhaven, Germany, by German POWs under the British supervision, into the North Sea as part of ‘Operation Backfire’. The explosive material in the warheads was steamed out and replaced with sand and for tracking purposes, these rebuilt missiles were painted in a black-and-white checkered pattern, similar to the early Peenemünde rocket schemes that were first tested 3 years earlier. 


In June 1945, General Eisenhower approved Operation Backfire, the British initiated Operation put forward by J. C. C. Bernard, A.T.S., Personal Assistant to Major-General Cameron, head of the British Air Defense Division. The objective of the Operation was to provide the knowledge and skills of guided ballistic missiles, to ascertain the German technique of launching long-range rockets and to prove it by performing an actual launch. Following the successful conclusion of the tests, the War Office in London issued a 5-volume report detailing these operations. Operation Backfire resulted in one of the most comprehensive evaluations and documentation of the total V-2 weapons architecture, not only by the Allies, but also the Germans!

If you’re interested in reading more, then check out this amazing article with photos and links to the 5-volume report. http://www.v2rocket.com

Saturday, 11 December 2021

Type II U-Boat

 My Type II U-Boat U20 is now complete. 

U20 was commissioned in February 1936 saw service first in the North Sea prior to being transferred to the Black Sea. In an attempt to avoid an overwhelming British presence around Gibraltar and throughout the Mediterranean U20 was broken into sections to be transported along the Danube to the Romanian port of Galați. She was then re-assembled at the Galați shipyard and sent to her new home in the Black Sea to serve with the 30th U-boat Flotilla against Russian shipping. 

She met her end, scuttled on 10 September 1944, in the Black Sea off the coast of Turkey. 

This 1:144 scale Type II is my second Revell U-Boat, the first being the 1:350 scale Type VII, both of which have been really nice to build, with what I think is some quality moulding and detail. I’m looking to use this in a B-24 Liberator diorama, so I’ve added a bit of poetic licence in applying an Atlantic colour scheme.

Friday, 10 December 2021

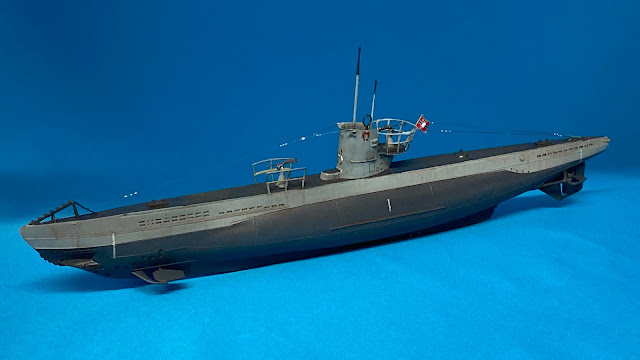
Type VII C U-Boat

My Type VII C U-Boat is now complete. This is U-96 as it was when it fought in the Atlantic between 1940-43. It met its end when it was sunk on 30 March 1945 at Wilhelmshaven by bombs during US air raid. 

During autumn 1941, war correspondent Lothar-Günther Buchheim joined U-96 for her seventh patrol. This experience was the basis for his 1973 bestselling novel Das Boot, which was adapted into the 1981 Oscar-nominated film.

The kit is Revell’s 1:350 scale which has some lovely detail considering its small size. I now need to decide if to use this or its 1:144 scale cousin in my B-24 Liberator diorama.

Monday, 6 July 2020

Tiger II

While lockdown has eased slightly this week, the war with C-19 has not gone away and neither has my build factory! Today, I had planned to bring you another medley of tracked vehicles but the material I dug out on the king of these seemed to demand its own entry. So, I’ll return with part 2 very soon. In the meantime, here’s a view and backstory on the King Tiger.

The Tiger II was Germany’s most expensive tank of the Second World War. It was unofficially known, to those who fought with them, as Königstiger (Bengal tiger), and by Allied troops, after a rather poor translation, the King Tiger. Porsche and Henschel were originally invited to design prototypes to carry the 88mm anti aircraft gun, which the Luftwaffe had so successfully used against Allied tanks. While Henschel finally won the contract, both the Porsche and Henschel turret designs were used in the production vehicles. An interesting factoid about the turrets is that they were actually both designed by Krupp, Porsche and Henschel designed the hulls, engines and running gear. The "Porsche turret" had a stylish rounded front that was both difficult and expensive to manufacture and which was also discovered to be less than effective; a well aimed shot could be fatally redirected via the rounded front into the gap between the turret and hull! The first fifty tanks were fitted with this early turret while the next 442 Tigers to run off the production line were fitted with the simplified, more thickly armoured and flat faced designed "Henschel turret", with no shot trap! 

The Tiger II first saw combat in July 1944, in the battle to hold back the tide of Allied advance following the Normandy D-day landings. In September 1944 Tiger IIs were sent east in a vain attempt to slow the relentless advance of Russian forces as they drove towards Berlin. While a very formidable weapon, the Tiger II was phenomenally expensive; costing $300,000 per vehicle compared to $30,000 for the Sherman, the Allies most prolific tank. In the end, while it was said to take at least 3 Shermans to knock out a Tiger II, the Allies won the battle of the tanks through the simple war of attrition. The Americans were able to mass produce so many Sherman tanks that in the end, the Germans were just unable to compete. 

Production of the Tiger II was severely hampered by air raids, in which it is estimated that over 50% of production was lost. It was also found to be unreliable; suffered from destructive oil leaks, under powered running gear and the lack of trained drivers caused many to become unserviceable. Combined with its thirsty engine and the severe fuel shortages of 1944, as the Germans lost control of their oilfields, many Tiger IIs were just abandoned having run out of fuel. If anyone has watched the 1960s film, The Battle of the Bulge, you'll know what I am talking about!

Airfix PzKw VI Ausf.B 'King Tiger', Normandy, 1944


My Tiger 2 model is supposed to be of  No. 113, from 503rd SS Heavy Panzer Battalion but my research points to tank No. 113 having been a member of the 101st Battalion, so it is this tank which inspires my backstory. 

After seeing some action in Normandy with their old Tiger Is, in August, 101st SS Heavy Panzer Battalion were re-equipped with 14 Tiger IIs, all with the production model turret (the "Henschel turret"). One of which was No. 104 on display at the Bovington Tank Museum.


Tiger II No. 113 in Beauvais, France. Late August 1944.

On the 3 September, my Tiger II, No. 113, was reported to be in combat with Task Force Lovelady of the US 3rd Armored Division when it was abandoned in Jemappes, Belgium. Its turret was left facing backwards supposedly towards the attacking American forces, just as the crew had left it when it ran out of fuel!


Note: I don’t know if Airfix have made an error in suggesting my tank is No. 113 or if this tank’s history was just less interesting and it disappeared without trace, but either way, modelling it with the "Porsche turret" is wrong for my backstory as the pictures of No. 113 clearly show it having the "Henschel turret"! Airfix don’t normally get these things wrong, and do usually pick on a source with a well known backstory, so this one is quite perplexing and perhaps requires more research ..

-------
The Model


Brand: Airfix
Title: Tiger Ausf.B 'King Tiger' Starter Set
Number: A55303
Scale: 1:76
Type: Full kit
Released: 2012 | Rebox (Model set)

BLOGGER IS DEAD LONG LIVE FACEBOOK & INSTAGRAM

It's been a blast Blogger, but not being able to upload any photos of my builds to this blog really makes you meaningless going forward....