Showing posts with label 1/48. Show all posts

Tuesday, 19 August 2025

Biggin on the Bump - Supermarine Spitfire Mk.I

 I know many scale modellers tire these days of seeing yet another Spitfire but with it being the 85th Anniversary of the Battle of Britain, I thought I'd press my luck with you all and build the first of the Merlin variants. This will at least be an interesting change for me, in that my most recent Spitfires have been the late VE-Day and  the even later Malayan Emergency Griffins. 

For my base model, I am using Airfix's 2025 re-release of the 1/48 scale Supermarine Spitfire Mk.I (A05126B). I picked this up with a Hurricane in one of the recent Battle of Britain (BoB) themed bundle offers for Airfix Club members, so you may see the Hurricane unboxed very soon as well, as I loved a themed project build. Unfortunately, the schemes provided in this kit include no BoB decals. The kit comes enabling the scale modeller to build a very early twin blade August 1938 Spitfire based at RAF Duxford, or two 3 bladed Spitfires: one in July 1940 French markings and the other in the colours of a 1942 RAF Middle East Training School aircraft. I will, therefore, be picking out my own scheme for this build, naturally taken from smack in the middle of the Battle of Britain.


I feel most fortunate to have lived my early formative years in Biggin Hill, known to many of the pilots of the Battle of Britain era as 'Biggin on the Bump' as the airfield is on located on a hill. Biggin Hill had a number of Squadrons based at the airfield during this period, including 32, 72, 74, 79, 92, 141, and 610, so I've had quite a decision to make!  I've decided in the end on an aircraft from 92 Squadron which arrived at Biggin Hill to replace an exhausted 79 Squadron on 8 September 1940.  In my Biggin Hill manual 'The Bump' which I've cherished since acquiring it at the time of the 40th Anniversary in 1980, its author, Nicholas Wright, recounts that " the '92nd Foot and Mouth' - had a reputation as a hard hitting, hard living and hard playing band of young men with an apparent disregard for military discipline and an unorthodox approach to their role as fighter pilots. Nevertheless, it was not the time for polite military niceties, and in the prevailing circumstances their approach proved effective - their casual nonchalance belied dedication, and a jealous spirit of high professionalism. Their stay at Biggin was to be protracted and very soon they were to become the best-known squadron in Fighter Command."

I also have an idea on a pilot which I'll share later. 

So ... let's now get on with the build which kicks off with the cockpit. What I've come to enjoy so much about these larger scale kits, having only recently ventured away from 1/72 scale, is the additional detail you get to see. I know I could go of a set of aftermarket resin or PE bits, I am of the mind that I can get close to as good a look with what comes in the box and a fine paint brush, especially when most of this interior will be difficult if not impossible to view once it's all enclosed in the fuselage and beneath a canopy.

One addition I'd love Airfix to consider adding, even if just to the decals, is a set of harnesses for when the pilot is not installed. I just think this adds a little bit of quality or  je ne sais quoi to the finish. Having sprayed the key interior parts with SMS Interior Green and a very glossy Silver and then hand painted the finer detailing of instruments and seat with Vallejo acrylics it was time to pull them all together.


As for the ease and quality of construction at this early stage, I would say everything was going perfectly well until it came to fix the two halves of the interior cockpit together. For me, the holes in the walls for the control column and rudder pedal bar construction were not large enough such that using far too much pressure to squeeze the two halves together, I broke off both connecting lugs and fired the control column handgrip into the jaws of the carpet monster! Fortunately, using super glue and a keen eye, I secured the now floating 'steering construction' in place, rescued the handgrip from the carpet monster and reattached it to the column - "nothing to see here" as they say! I then affixed the rather basic instrument panel decal, something I always like to do as late as possible for fear of damaging it when gluing everything in place; an approach I was particularly pleased I followed on this occasion too! N.B. at the risk of repeating myself, I would much prefer Airfix provide a harness decal in place of an instrument panel, especially when they produce such detailed mouldings of this which would look just as good as the decal provided with a bit of careful dry brushing.  

I note that I am now going to have to decide on open or closed cockpit - closed will require me to remove a slither of plastic from above the side entry flap - and if open, whether I want the side entry flap open or closed - open will require the careful removal of the moulded flap. Thinking ahead to how I want to final display this model, I'm leaning towards Open / Closed and no, that's not just because it's the easy option!

While I’ve needed to use a little filler along the wing joins and cowling, the fit is generally great. I do, however, miss locating pins on the wing halves as mine did wonder a bit even when clamped but I think I’ve gotten away with it.


Primed and RAF Sky underside sprayed we’re now getting close to the aircraft and pilot reveal.


This 1940’s Spitfire, in its Temperate Land Scheme camouflage, had neither yellow leading edge markings nor a sky tail band, both of these being added during 1941, and so the masking and painting here is going to be much simplified! 

For the upper surface camouflage I've tested out my new stock of AK lacquer paints and yes, they are lovely and I think a better colour match than my first experience with SMS’s lacquer RAF colours. 


This Masking Putty is great stuff but I do find it tricky sometimes to control!  this 92 Squadron Spitfire has the type B camo format and not a style much used in model kits from my experience as I really had to think as I applied the shapes.


Finally, I’m sure you want to hear who will be flying this Spitfire.


Well, my Spitfire’s pilot will be 24 year old  Sergeant Peter Raoul Eyles (565889) of Hook, Basingstoke who in September 1932, at the age of 16, joined the RAF as an Aircraft Apprentice. He passed out in August 1935 and later applied and was accepted for pilot training. Completing his training at RAF Shawbury 11 Flying Training School, he joined 92 Squadron at Tangmere on 23rd October 1939.

October 1939 is a significant month as it was on 10th October that No. 92 Fighter Squadron was reformed as a night fighter Squadron at RAF Station Tangemere, equipped with Blenheim aircraft and with an establishment of 21 Officer and Airmen Pilots, 2 non flying officers and 209 other ranks. 

I love the comment in the Squadron’s new Operations Record Book of the day which on 21st October reads “Information received that ten Pilot Officers and three Sgt Pilots are being posted to the Squadron direct from 11 and 13 FTS. Children though they may be it is hoped by some Devine providence they will have flown twins”. Devine providence did intervene as all had flown twins! 

Decals and ancillary bits and bobs are the order of the day today.


First up the wheels and having previously struggled with the insanly weak fitting Airfix provide for their 1:48 scale Spitfires - or at least for the majority I've built - I now reach for the drill, superglue and fuse wire to provide some much needed bracing. I dare say that if one was to glue these in place, clean plastic to clean plastic and let them properly cure, they may have enough strength, but I like to leave undercarriage until the end of the build when access to the joining edges is restricted and overpainting is hard to avoid such that getting a clean accessible surface to bond to is neigh on impossible. Wiring the wheels in place seems to work every time for me in such cases.


Sergeant Eyles's Spitfire has now been given its squadron markings. While not exclusively, the aircraft he seems to have flown most is N3248 QJ-P and with Xtradecal providing just the decals I need, I thought I'd make use of Hannants services, also ensuring that I have the correct size roundels and fin markings. On opening the decals, I noticed that Xtradecal had provided with their QJ-P markings the aircraft number N3239 and not N3238, i.e. one digit higher than I was expecting. This in itself is interesting as N3239 was also one of the aircraft flown by 92 Squadron during the early days of 1940 when Eyles was flying N3238 before moving to 602 Squadron in August, but it is N3248 and QJ-P that I've found most frequently reported together. Either way, as it's just you and me who are now aware of this I've not bothered raiding my spares box for a figure "8", life's too short for that!

And what of Sergent Eyles?

It appears that Sergeant Peter Eyles was, as one would expect, a capable pilot. He had just one spill that I've found to his name, which was when on 9th March 1940 his Bristol Blenheim tipped up on its nose while being taxied over a bad patch of ground after landing from formation flying practice at RAF Croydon, Surrey. The aircraft was apparently damaged but repairable and Sgt Eyles uninjured. His first operational 'success' occurred over Dunkirk on 2nd June 1940, when having been operational on Spitfires for less than a month, he was recognised for causing damaged to an He111. This was one of the squadron’s busiest days over the French coast in which the squadron accounted for fourteen enemy bombers and four fighters without loss, bringing its tally to over 50 machines. This just goes to show how active the RAF really were over Dunkirk contrary to the observations of the troops on the ground.


I'm reasonably pleased with how this Spitfire is coming together. There's just one area of painting I wish, had I spotted it earlier, I'd gone back over and this is at the join with the starboard wing, but I'm thinking that if and when I add those typical Merlin exhaust stains it will be less visible. Meanwhile, it is sitting trying out in its just delivered state. Therefore, after studying a few more reference photos of the time, I'm just left with having to decide on how much weathering to apply, pull a base together and a couple of figures to add ... oh yes, and then there is the rest of Peter's story to tell.

I'm thinking that as I'm looking to have this displayed in a small scene/vignette, I'll will do some weathering, else I'd probably be tempted to leave it in museum fresh condition.

I've looked out a few archive pictures (see below) and as the Mk.I had no protective walkways on the wings it would appear that the paint wore quite badly.


As N3248 was delivered to 92 Squadron in March 1940 and by the time of the Battle of Britain it would already have had close to 6 months of serious wear, I thought - with trepidation - I'd attempt to create something similar on my model. And this is how it has turned out ... 


I also added exhaust and gun smoke stains, a few oil spill marks and grime to a few panel lines.

I'm still waiting on the base I want to use so this is just a taster. I have however painted a set of ModelU figures. This is their 1:48 scale "WWII RAF Photographer scene" figures which I selected for my little vignette inspired by all those photos I've come across, while researching this build, of pilots photographed with their mates in front of their aircraft. I feel this makes a change to the more usual scenes of pilots scrambling to their machines or views of their aircraft being rearmed.


Here’s my Airfix 1:48 scale Spitfire Mk.I tribute to the few. 

Completed in the colours of Spitfire Mk.Ia N3248 QJ-P of 92 Squadron stationed at RAF Biggin Hill and flown by 24 year old pilot, Sergeant Peter Eyles during the Battle of Britain. 


Finished with AK acrylic and lacquer paints, Xtradecal aftermarket decals, ModelU RAF Photographer and Pilots and a Coastal Kits diorama airfield hardstanding base. The scene is intended to depict Sergeant Eyles on the right and fellow pilot, P/O Hill (who coincidentally flew N3248 in the weeks prior to Eyles) having their picture taken in front of Eyles's Spitfire N3248 QJ-P. I was inspired to create this scene having seen many similar photos in the WWII archives.


On the 20th September 1940, 92 Sqn were ordered to patrol at 5000' over Gravesend. The Squadron Operations Record Book records the events as follows: "Weather was fine, but layers of cloud from 4-9000ft. Ten aircraft took off in the am and intercepted formation of ME 109s who surprised Blue Section from behind and above. P/O HILL crashed and burnt out in DOVER AREA and SGT EYLES crashed in the sea. S/LDR SANDERS destroyed a ME 109 and another was damaged by P/O WADE"

Both Hill and Eyles were reportedly shot down by Luftwaffe fighter ace Major Mölders of JG51  increasing his tally of aerial victories to 40, the first fighter pilot to reach this number during the war and was awarded the 2nd Knight's Cross of the Iron Cross with Oak Leaves. Before his own demise on 22 November 1941 he became the first pilot in aviation history to down 100 enemy aircraft!


I never thought my hobby of making models would ever be as moving and thought provoking as this one has been. 


Wednesday, 11 June 2025

British Forces Land Rover Patrol

What to do while the Jackal’s glue cures? Make a start on its Operation Herrick “brother”, the Land Rover of course! 

The parts for the Land Rover come on just 2 runners, so one less than the Jackal but this ‘… Patrol’ gift set is supplied with a number of British troops attached to a very distinctive brown plastic runner.  I’ve not yet had chance to look at them close up yet, but it will be very interesting to see what Airfix have provided, it being a long time since they’ve done anything new with figures. 

I hadn’t intended motoring so far ahead with this build but as I started  on the front area, I couldn’t help thinking I needed to press on at at least attach the screen, wings and grill else I’d never get any of these parts to line up with each other later. I’m finding the fit and moulding of this Land Rover to be far less positive and well fitting as the Jackal.  I do, however, think they will make a nice pair when complete. 

To me it’s hard to believe this Land Rover came from the same 2012 stable as the Supercat Jackal, but I am being hypocritical as the Jackal’s moulding is sublimely brilliant. 


When fitting the final walls and doors to this kit, I had to use a little tape to straighten the panels and prevent it looking like a cut and shunt insurance write off!

I thought I’d try a bit of camo netting on this as it seems to have been a regular feature from the archive photos I’ve seen. I still have quite a bit of work to do to make it look a little more convincing and obviously the all important doors and glazing to fit too. 

It should also start to look more the part once I get out the weathering powders as it’s looking far to factory fresh at the moment. 

I wasn't 100% happy with the camo netting feeling it needed the rags adding ... I may have over done it, but after spending 2 hours painting, cutting and applying little bits of masking tape, I'm preferring the look.

After this, I added a little light weathering and painted up a few of the supplied figures and for me, that's it done.

Although a bit raw in places, this kit does have a few nice touches ... for instance, mesh decals for the side windows and the drop down front armoured and grilled windscreen which I did attempt to attach but it would not fit over the wiper blades, so I left it in the down position. 


Tuesday, 10 June 2025

Supacat Jackal

My next build is taking me somewhat out of my 1:35 scale WW2 comfort zone and right up to date with this  1:48 scale Supercat Jackal. I bought this together with its sister Operation Herrick Afghanistan kit, the Land Rover Patrol, after I noticed my friend’s modern AFVs were getting more interest at a recent Scale Model Show than my WW2 collection. I guess it’s a generation thing! I am also putting on a small Armed Forces Day display at the end of the month and felt perhaps I should move with the times. 

The Jackal or MWMIK (Mobility Weapon-Mounted Installation Kit) is from a family of vehicles designed and developed by Supacat Ltd at their factory just up the road from me, in Honiton, Devon, for use by the British Army and Royal Air Force Regiment. So I feel, even more a good reason to build it, if I needed one! The Airfix kit has just 3 runners and no glazing, so I'm thinking this could be a quick one! 

I read that the vehicle's height-adjustable air suspension system can be lowered onto the bump-stops to provide a stable firing platform when stationary or raised to a maximum 380 mm ground clearance allowing it to clear large obstacles. The detail Airfix have put into this kit’s suspension is really excellent, and perhaps if it were to be re-released, having the option to build lowered in the firing position would be great idea. 


The fine detailing and fit is superb. I love the opening doors and rear “whatever’s” … I guess I’ll find out what these are later … but the hinges are very delicate so I’m sure I’m going to break one off before the build it complete.

I’ve given it a bit of colour and fitted the wheels. For some reason, as the rest of the kit is wonderful, those wheels needed quite a bit of work to get them fitted, but fitted they now are. I also added some belts as I saw these quite visible in the archive photos. 

Next up will be decals, guns and a bit of dusty weathering. I’m also wondering whether to add camo netting that I’ve seen in some photos.


A little weathering, no netting and I'm now done with the Supercat Jackal. 


Wednesday, 22 January 2025

F-51D Mustang

My 5th model of 2025 is Airfix’s F-51D Mustang, which I’ve selected to build as part of my current Korean War project. 

I found this a very nice kit to build. Although I had a number of different after market decals for both US and Commonwealth UN markings, I decided to run with the Airfix set and finished it in the colours of Mustang 44-74625/FF-625 of 67th Fighter Bomber Squadron stationed at the forward operating base at Hoengsong, South Korean in 1950.

I used my new favourite silver paint, Vallejo’s Liquid Metal, for most of the aircraft and added Vallejo’s standard aluminium acrylic to provide lowlights to the wings. This was a mistake as not only do I think the effect detracts from the overall finish, subsequent masking of the red wing tips removed some of the aluminium! Time to acquire the rest of the Liquid Metal range. The decals went on very nicely, and to be honest, this was probably what finally swayed me to go with Airfix’s and not the aftermarket ones, you know what you’re getting with the new Airfix kits. In view of my feelings towards the paintwork, I finished the model with a layer of satin varnish.

The aircraft features the nose markings ‘ROTATION BLUES’ on the starboard side cowling, presumably after the record of the same name which was popular in the US at that time.

As a result of the North Korean invasion of South Korea in June 1950, the squadron was moved from the Philippines to Taegu Air Base, South Korea in July. At Taego, the squadron exchanged its Lockheed P-80 Shooting Star jets for propeller-driven North American F-51D Mustangs which were more suited to the ground attack and support role. I thought, therefore, that it would be OK to use one of Academy's standing F-86 pilots with helmet rather than the WW2 dress figure supplied with the kit.

Next up will probably be a Chinese T-34 followed by a North Korean MiG-15 … I fancy a piece of armour!

Tuesday, 21 January 2025

Fokker D.VIIF

 My 4th build of 2025 is this 1:48 scale Eduard Weekend edition of the Fokker D.VIIF

This is my interpretation of the Fokker biplane flown by Ltn. Ernst Udet, in 1918. It’s a little different from the version in the kit as rather than fitting the lozenge pattern decal to the upper wing I masked and painted the stripes that Udet had on an earlier aircraft and  is believed he went on to add to this one too. I also painted the stripes on the tailplane to match before realising a decal was included. Ernst Udet the most successful surviving fighter aces of WWI, with 62 confirmed kills. He named his aircraft, LO! after his fiancée Eleonore ‘Lo' Zink.

I found this a nice enough kit to build, although as I usually find on biplanes, the holes in the wings had to be drilled out, they are never large enough to hold the struts; the length of the struts are either too long or too short for the gap between upper and lower wings and without a jig, the whole thing can all too easily slip out of shape! The decals look great but I found the amount of carrier film to be excessive and the many additional lozenge decals for the wings with little or no instruction somewhat confusing. Some of the detailing is excellent, especially the engine. I welcomed the addition of harnesses decals, although they look a little unconvincing when applied.

This has been both the first 1:48 scale biplane and the first Eduard kit I’ve built.  I was very impressed with the presentation: the quality of the instructions, the layout of the sprue pieces and the range of decals. I thought this may even have been the start of a WWI aircraft building phase for me, alas no. I’m still not a fan of how biplane kits have to be constructed and I can’t seem to make them look more than just a toy aeroplane.

However, I built this kit to illustrate a popular form of WWI nose art for a talk I’m doing later this week, and for this it’s perfect. It is also because of this that I have omitted the rigging. If, however, the model survives being transported to and from the event, I may have a bash at rigging it.

Saturday, 11 January 2025

Curtiss Tomahawk Mk.II

Build No.3 of 2025. This is Airfix's 1/48 scale Airfix P-40 Tomahawk MkIIB. 

I've completed the build in the colours of AK128 BT-H, which was an aircraft of No.1686 Bomber (Defence) Training Flight at RAF Hixon in Staffordshire attached to 30 OTU (Operational Training Unit), in 1942. This is an unusual assignment for a fighter as 30 OTU was part of No. 93 Group RAF Bomber Command.

No.1686 Training Flight were equipped with P-40 Tomahawk aircraft formerly used by No. 112 Squadron in North Africa and it is suggested that this is why they retained their distinctive Sharks Teeth markings. The aircraft of this unit were required to fly simulated fighter attacks against Wellington bombers, of 30 OTU, so that the turret gunners could practice against a fighter attack whilst airborne.

This Tomahawk met its end  in a taxiing accident at RAF Hixon on 23rd December 1943, when RNZAF pilot, F/Lt L.M. Ralph, inadvertently struck a fuel bowser whilst heading either too or from the main runway at the airfield. Whilst he escaped the incident without  serious injury, his aircraft was less fortunate and was immediately scrapped.

_______

The kit: 


Brand: Airfix
Title: Curtiss Tomahawk Mk.II
Number: A05133A
Scale: 1:48
Released: 2024 New decals


Sunday, 5 January 2025

Republic P-47N Thunderbolt

First build of 2025!

Revell's 1:48 scale Republic P-47N Thunderbolt 44-88835 'Red E Ruth' of 19FS 318FG Le Shima 1945 with Pilot Capt Don Stuck in the cockpit.

This is a Pro Modeler 1997 moulding re-badged and relased by Revell with new Decals in 2012. It was a nice simple build with none of the silly over engineering Airfix have indulged in recently. The figure was brilliant albeit with the canopy closed he's not very visible. Engine detail is likewise very nice, but unlike Andrew's PE2, there's no way to expose this. Overall, a reasonably good kit if you want a P-47 bubble top in your collection.

I actually purchased this for no other reason than it was keenly priced and I thought I could use it as an exhibit for a Nose Art presentation I'm giving to the local u3a Art Appreciation Group later this month.

________

The kit:

Brand: Revell
Number: 04867 (80-4867)
Title: Republic P-47N Thunderbolt
Scale: 1:48
Released: 2012 New decals


Tuesday, 24 December 2024

F-86F Sabre - Mikes Bird

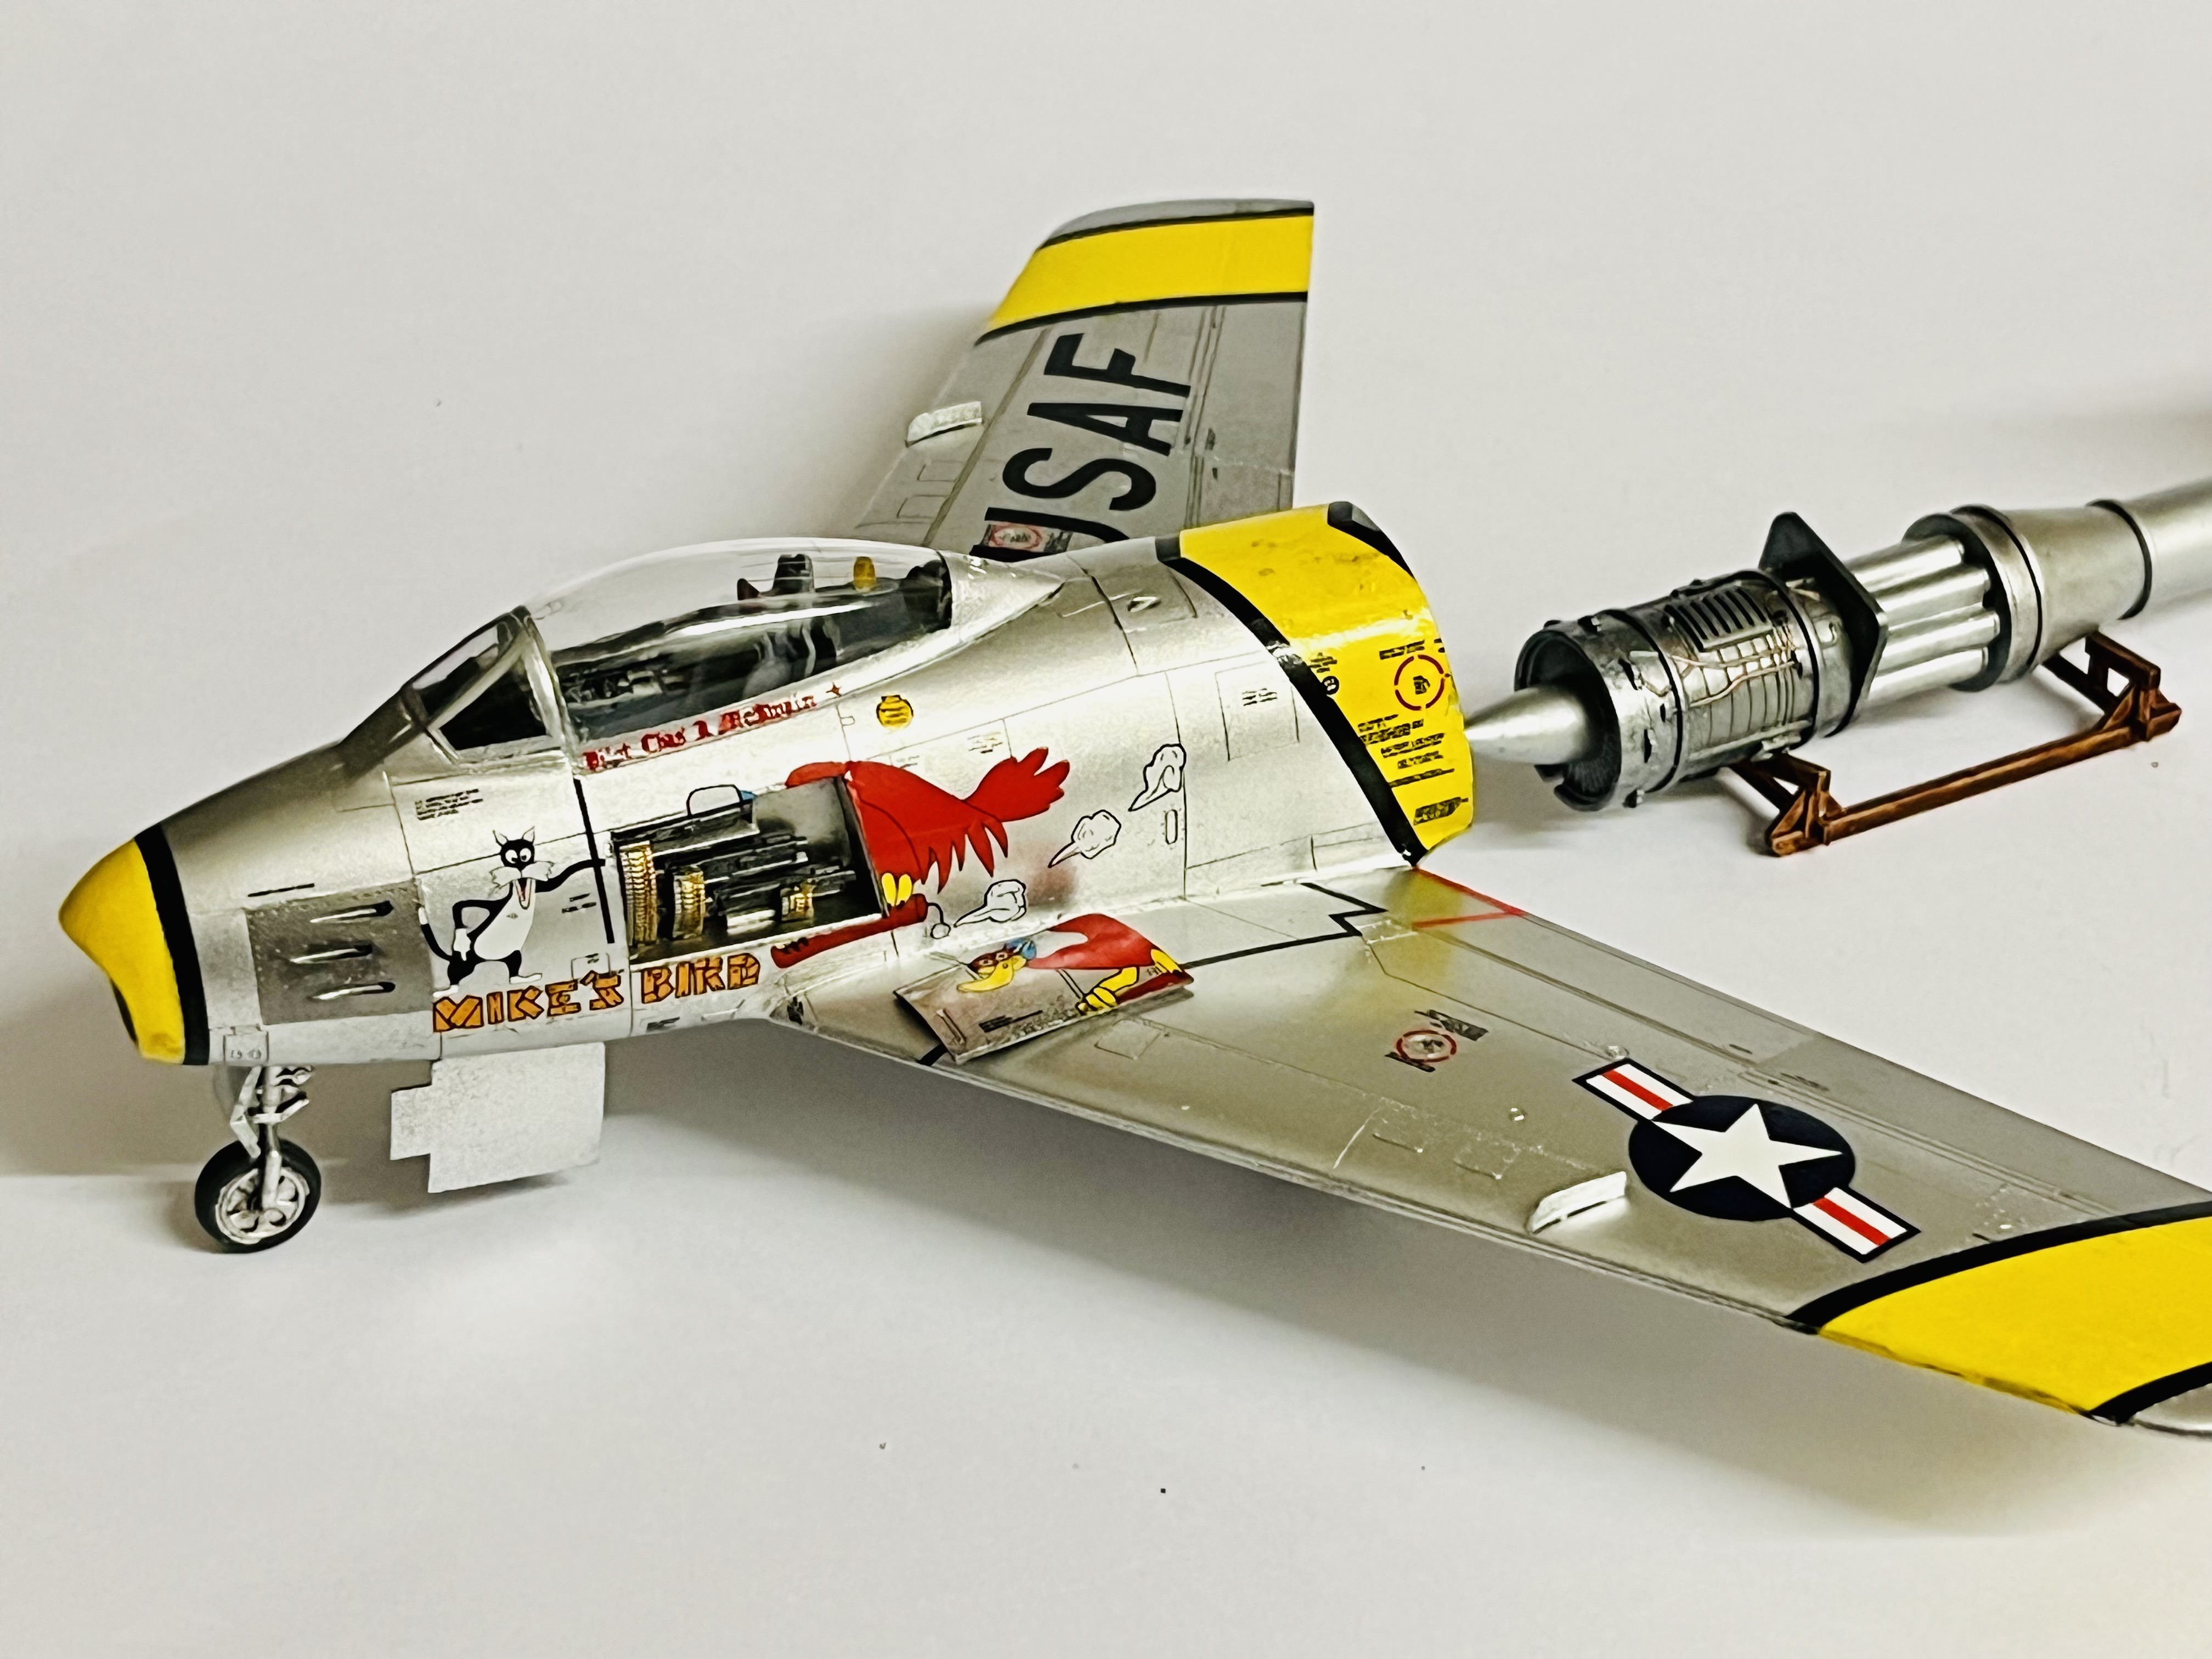
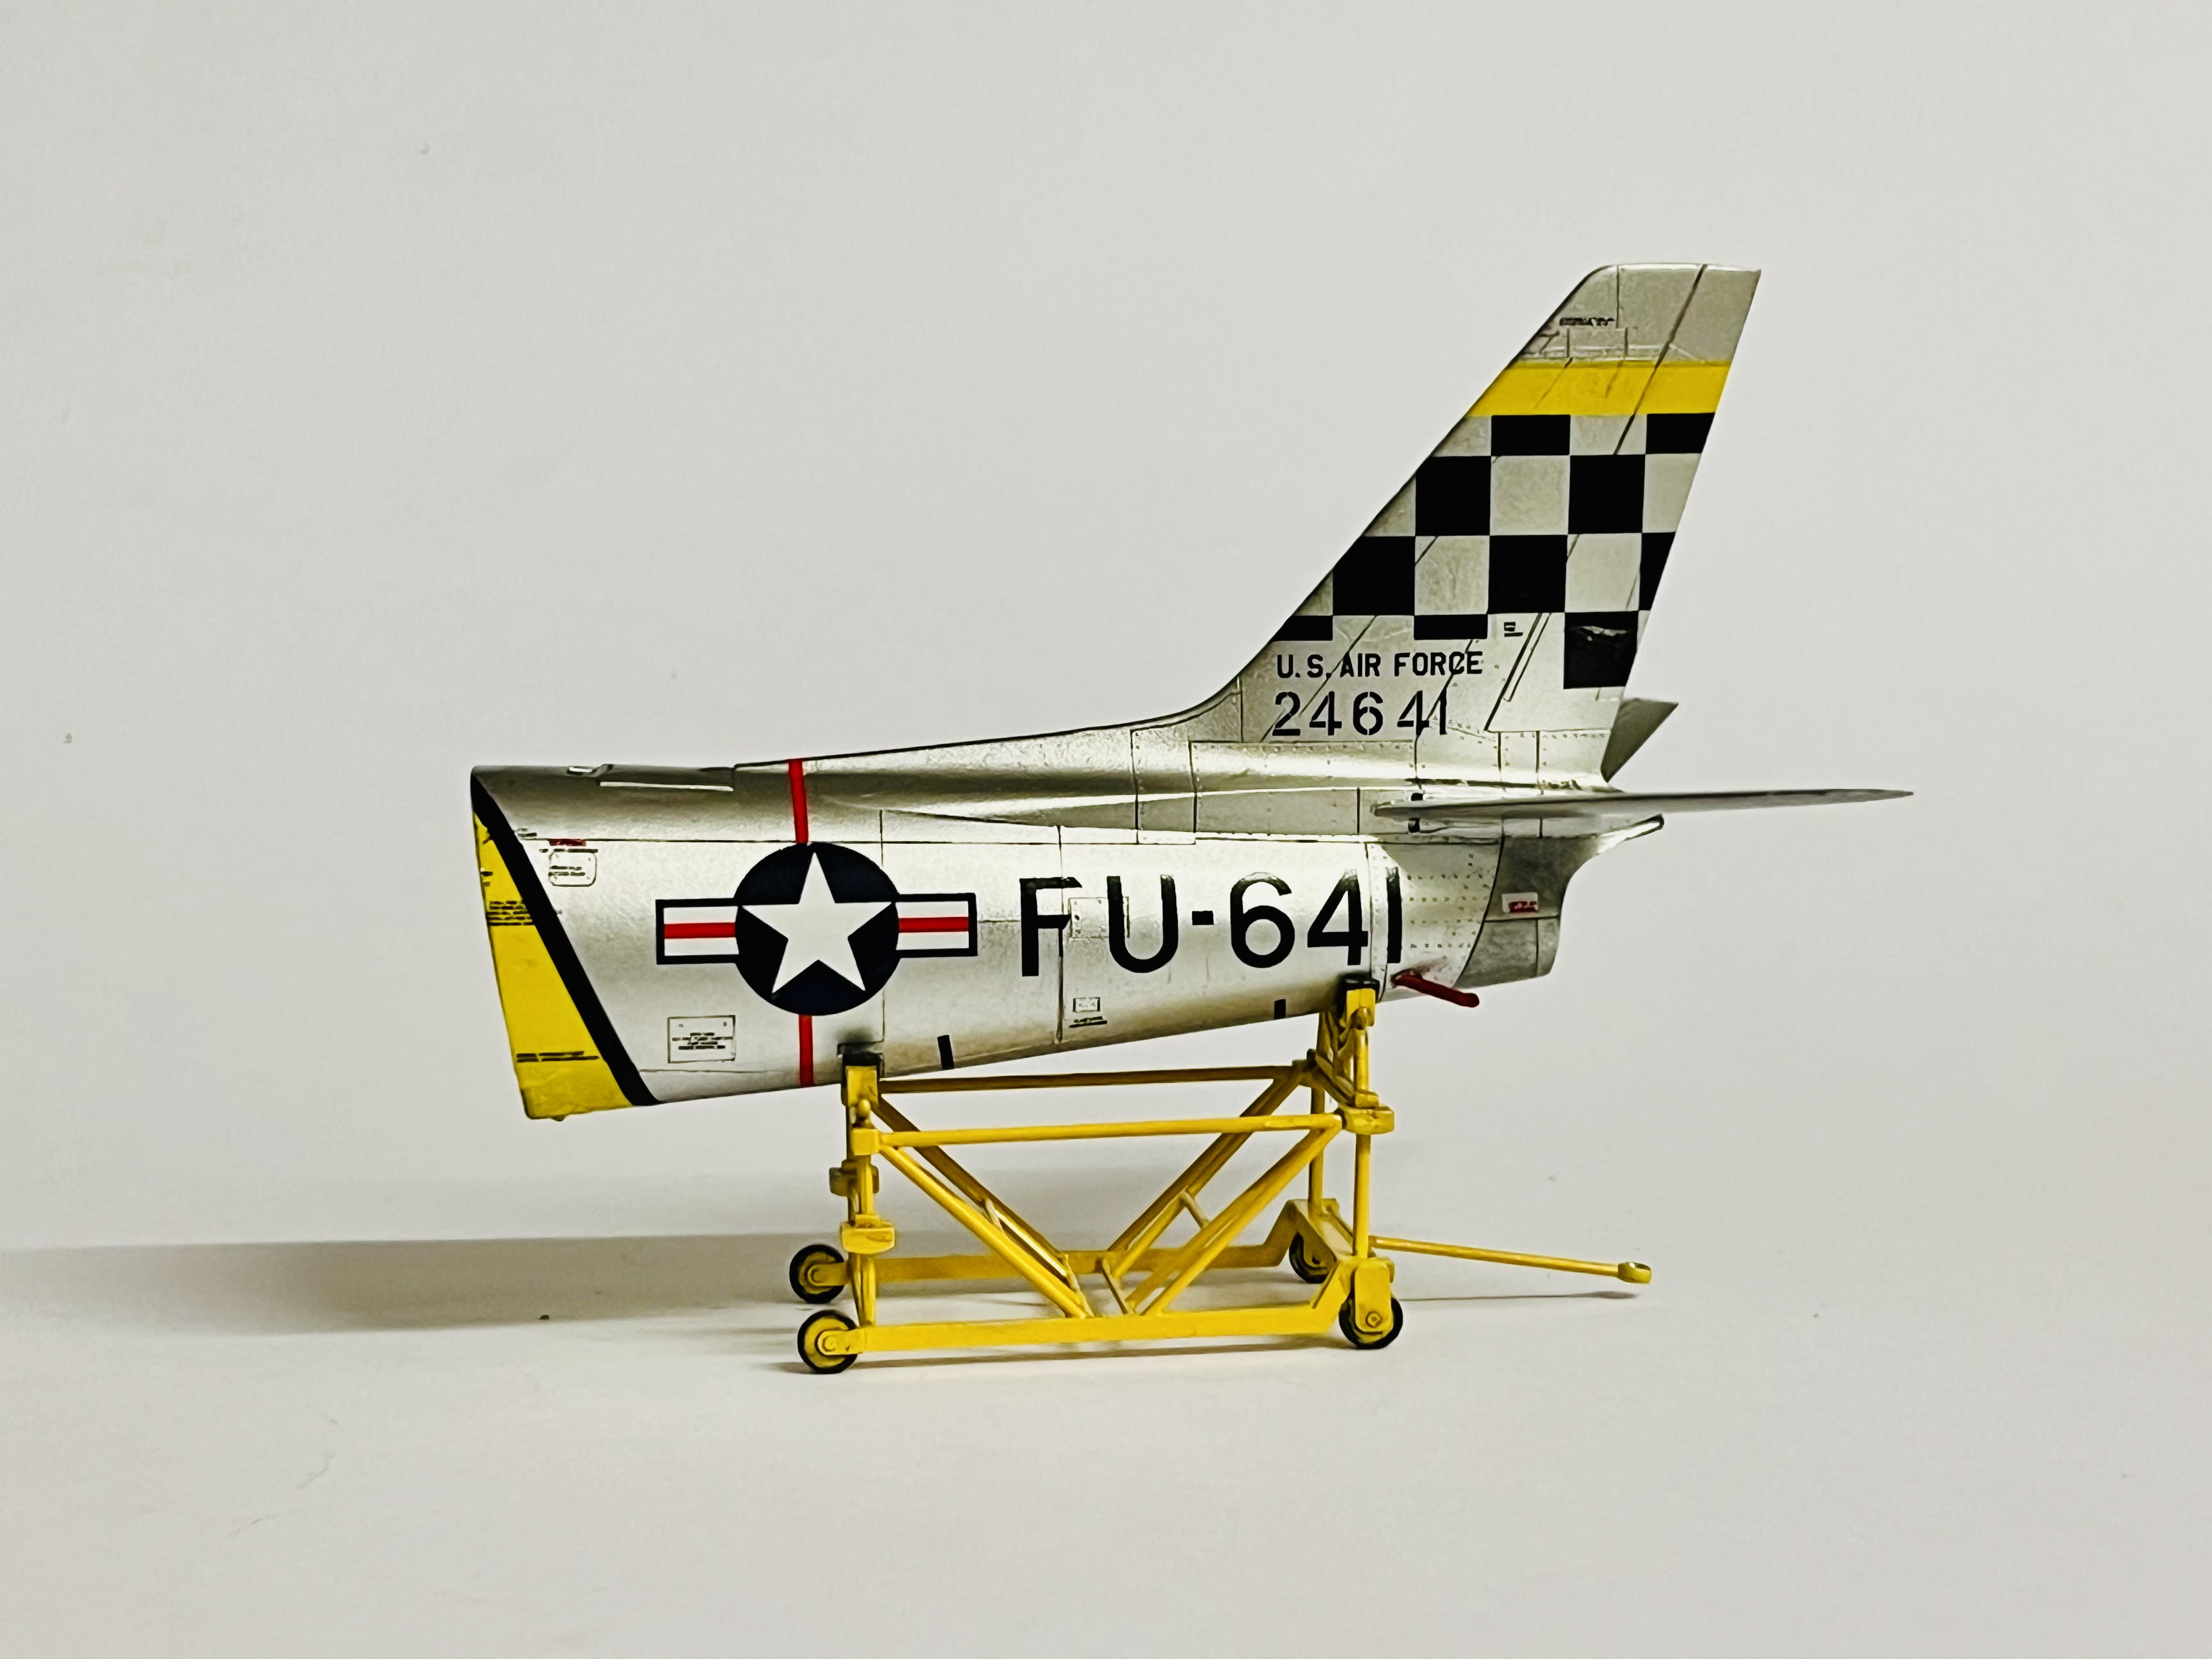
Here’s my second Christmas F-86F Sabre, Capt. Charles McSwain’s “Mikes Bird”, which coincidentally flew in the same squadron as my first F-86, “The Huff”: 39th FIS / 51st FIW, Suwon (K-13), South Korea.

Although I can not find anything about the history of “Mike’s Bird”, I did learn an interesting fact relating to why it and its fellow squadron aircraft wore yellow bands and had checks on their tails. 

When the Americans arrived in Korea with their F-86 Sabre it became apparent that it looked dangerously similar in flight to that the Soviet MiG-15. Therefore, the 4th Fighter Interceptor Wing (FIW) started to paint forward-slanting black-and-white stripes on their fuselages - similar to 'D-Day invasion stripes - to prevent F-86 Sabre pilots from mistaking each other for the MiGs. When in  November 1951, the 51st FIW Group transitioned to the F-86 Sabre, their commander, Lt Col George Jones, didn't want to just copy the 4th FIW stripes, so he asked Capt Ed Matczak, his group material officer and budding artist, to design something different. He came up with the rearward-slanting yellow band on the fuselage, and yellow bands on the wing and tail. Later, the wing also went on to add the black checkered markings copying the WW2 design used by 325 Fighter Group the 'Checkertails’.


In my build of “Mike’s Bird” I used Academy’s amazing 1998 moulding of their 2011 “The Huff” kit and while I used the kits “The Huff” decals on the 1:48 scale Airfix kit I shared earlier, these “Mike’s Bird” decals were gifted to me by a good friend from the original 2011 Academy kit that he had in his stash. However, while the moulding has stood the test of time the decals less so, but if you’ve been following you’ll know that I pressed on regardless!


If you were looking to build an F-86F Sabre and were undecided over whether to go 1998 Academy or 2022 Airfix, unless you wanted to show the earlier model’s extended leading edges, I’d have to recommend Academy every time. From quality of design to crisp moulding, detailing through out from interior to engine, guns to airbrakes and most surprising of all, two excellently crafted pilots!

Happy Christmas all! 

Monday, 23 December 2024

F-86F Sabre - The Huff

Finished for Christmas. The 1:48 scale Airfix F-86F Sabre. 

Lieutenant Jim Thompson's F-86F "the Huff", famous for being photographed with the most astounding nose art of any USAF fighter in Korea. 

Thompson, was a wingman in the 39th Fighter Interceptor Squadron (FIS) of the 51st Fighter Interceptor Wing (FIW), at Suwon (K-13), South Korea, in 1953. 

When he shot down a North Korean MiG-15 in May 1953 that had a dragon painted on its nose he convinced his Crew Chief to put a dragon on his Sabre. He must have eventually shot down another MiG as the decals come with the option of one or two kill star markings. I went with two, just three more required to make him an ace! 


I am not sure why, but on the starboard side of "The Huff" there is artwork for ‘Miss Jenny" & "Bill’s Baby" with the names of JW Manney and LD Cromwell. I've yet to find any reference to why or when these were added ... so most interesting! 


The kit I’ve used here is the 2022 release of Airfix’s F-86F Sabre with "The Huff" decals from the 1998 (2011 release) Academy F-86F kit. The Airfix kit does allow for the modeller to have gun covers and air brakes open and even forward wing slats extended but I wanted to show the aircraft ready for flight and use the second more detailed Academy kit as an aircraft under going maintenance. I’ve also installed Academy’s pilot which in addition to be better detailed is also more historically accurate. 

Paints used were all Vallejo and the silver was their unique alcohol based Liquid Metal. 

BLOGGER IS DEAD LONG LIVE FACEBOOK & INSTAGRAM

It's been a blast Blogger, but not being able to upload any photos of my builds to this blog really makes you meaningless going forward....