Thursday 25 February 2021

MINI Countryman WRC

In 1989 I have the good fortune to have a go at stage rallying in a 10 year old yellow Mini 1275 GT, with my best man & co-driver, Dean. We completed at least 4 rallies around the East of England and ended the season with a 3rd in class!

I've built very few scale model cars: a nice Peugeot, Paris Dakar Rally car, probably some 15 years ago, and since then, two Aston Martin DB5s, which were awful! So my confidence must have been high when I set out to build a World Rally Championship Mini Countryman kit, although being one of Airfix's Starter Kits, I thought, what could possibly go wrong. Everything!


The secret of building scale model kits, is knowing which bits to paint before glueing and when to attach the delicate parts and affix decals. I thought I'd build my mini in 3 separate parts, the glass, chassis, body and fix them together at the end of the build. The glass was such a poor fit that I would have liked to have used some filler, the decals on the glass had to be fitted before fixing to the body and the body did not fit cleanly to the chassis! 

If I was to make another, I would approach it as I do a model aircraft kit. Paint the interior, fit the glass and secure body to chassis. Then mask the glass and paint up as I go, fitting the wheels, mirrors and aerial at the end.

Although not happy with the final finish it does still remind me of my happy rallying years and make me wonder .. "what if" we'd continued with the sport, could our next car have looked something like this. 


----

The Model


Brand: Airfix
Title: MINI Countryman WRC Starter Set
Number: A55304
Scale: 1:32
Type: Full kit
Released: 2013 | Rebox (Model set)


Thursday 18 February 2021

The Making of Port Stanley's Globe Hotel

In my last post, Victory in the Falklands, I introduced the fact that I had competed my first ever scratch built building, but did not have time to go into the detail. Well here are a few snaps of how it came together from bits and pieces of card and wood that I had lying around.

Surplus card from a hanger for the roof, wood from the Vietnamese village for walls and base,
and a bits of a packaging for the eves 

Windows cut, walls erected and porch constructed and wallpapered!

Mock Tudor styling added, door cut, chimney built and first draft of Globe Hotel sign made 

Corrugated roof weathered, walls painted, windows fitted and signage added.
WW2 British soldier dropped in to test out the door, which despite spending seemingly hours scaling it, still seems too large

A bit of weathering added to the building and
that WW2 soldier is still there reminding me that the door looks too large!

Final weathering, a sprinkling of snow and a troop of Paras added,
replacing that annoying chap from WW2

Filling the street with Scorpion and Scimitar tanks, a Landrover and fuel tanker behind, with an Argentine Panhard armoured car abandoned on the left.


Discarded kit, a telegraph pole, wire and the Argentine's temporary "Keep Right" sign
complete the diorama


Victory in the Falklands

This is the final post from my Falklands War scale modelling project, inspired by a good friend of mine who took part in Operation Corporate, serving with one of the Royal Navy's Sea King anti-submarine squadrons. After building a model of the helicopter on which he actually worked, I found I could not just stop there. Each and every book and article I then picked up, drew me in deeper. Each page turned and new fact learned was then brought to life through the build of a new model; the acquisition of some, either no longer in production or not available in the UK, also led me on some interesting journeys!

The Falklands War ended with the surrender of Argentine forces on Monday 14th June. British Task Force commander, Admiral Sandy Woodward, says the conflict lasted 100 days, which give or take a day or two is about the same time it has taken me to build, paint and prepare my 20 plus models, with accompanying pilots, mechanics and troops. 


One model I built at the very start of this project was not a traditional boxed Airfix type kit, but my very first scratch built building. As my friend shared his experiences, he touched on some time spent on the island after the war, helping repair and repaint some of residents' corrugated iron roofs -  typical of the Falkland Islands - and his visit to Port Stanley's Globe Hotel for a well earned drink or two. During my subsequent research, I frequently came across a post war photo of British troops in Philomel Street, Port Stanley, with the Globe Hotel in the background.

My attempt was not create an exact replica of the street but more to place my models in a diorama with a landmark which would resinate with the viewer. In adding this to my growing mosaic of scale scenes, it now sits between the glaciated mountains of Operation Paraquet, the beach landings of Operation Sutton and along side a Korean MASH unit and a Malayan Emergency jungle scene!

So, returning to the Falklands War and jumping back to D-Day, Operation Sutton, and 21 May 1982.

Aboard the ferry Norland Lt Col H Jones with 2 Para asked the naval signaller to flash HMS Broardside along side is any orders had been received. The response was:

TOP SECRED OPERATION SUTTON
CTG 317.0.19N 190230Z May
Ships pass to embarked forces
  1. D-Day 21 May 82
  2. H-Hour is 210639Z May 82
  3. Break down and issue first line ammunition forthwith
  4. Act immediately
This was the confirmation that Operation Sutton had been given the go-ahead by the British government, and the UN who were expected to have intervened to prevent a land offensive, had not come to pass. 

At 07:30, an hour late, 2 Para waded ashore along the southern end of the beach at San Carlos, while 40 Commando, with Scorpion and Scimitar tanks of the Blues and Royals, landed a few hundred yards further north. San Carlos, a settlement of 30 people was the first community on the Falklands to be liberated.

After a period of digging in, slowly building up supplies of munitions and equipment from the ships anchored in the bay, London were now demanding a tangible victory from the Paras and Commandos. A 20 mile beachhead was now secure but the loss of shipping to Argentine air attack was starting to hurt, so on 27 May, they launched a breakout with three targets identified. 3 Para set off for Teal Inlet, towards Port Stanley. 45 Commando boarded landing craft to Port San Carlos, to then march on Douglas, north of Teal Inlet. 2 Para got the short straw and started walking the 13 miles to Goose Green. Here, Argentine ground forces released a barrage of artillery, mortar, machine-gun and anti-aircraft fire, while from above Pucara and Skyhawks strafed, bombed and napalmed them. Unable to advance, Lt Col H Jones, single handedly stormed a machine-gun, but was struck down and killed; meanwhile his 2 Para performed a flanking move, encircling the Argentines held up in the settlement. At first light on 30th May, a couple of Argentine prisoners were sent in with a white flag and letter to inform their commander that as he was surrounded the time had come to surrender. This was accepted. The expectation was then that around 80 POWs would be taken, instead a force of more than 900 Argentine troops lined up to lay down their arms, more than three times 2 Para's number! 

The next objective was to secure the high ground around Port Stanley. 42 Commando joined the fight, moving by air to Mount Kent. 3 Para established a forward base at Douglas settlement and 45 Commando arrived at Teal Inlet. The Scots Guards meanwhile embarked in Sir Tristram for Bluff Cove and establish a forward base, but tragically, the Welsh Guards, held up on Sir Galahad, were bombed by Argentine Skyhawks along with the now empty Sir Tristram, with the loss of 51 men. 

By the end of the second week of June, following major overnight assaults on the Argentine defences around Stanley, 42 Commando, 3 Para and 45 Commando had taken the strategic high grounds of Mount Harriet, Mount Longdon, and Two Sisters. The following day, Sunday 13 June, the Scots Guards attacked Mount Longdon, Gurkhas occupied Mount William and 2 Para, who's decisive action at Goose Green, 2 weeks earlier, launched what was to be the final action of the war, on Wireless Ridge. By early morning, the British troops had overcome and set aside all that the Argentines could muster, and later that day, Monday14 June, the Argentine forces surrender.

Most troops never received a direct order to proceed, they merely realised that they had reached the point at which they were going ahead unless ordered to halt. No such order was received until they reached Port Stanley!

In completing this project, I mentioned that there were a number of books which went on to inspire my scale model builds and it is safe to say that my library has expanded in step with my knowledge and understanding of this conflict. I can highly recommended at least these 8 good books, written by both historians and those who were there.


The 20 or so models that have appeared in at my earlier posts, are shared again in the montages below, in case you missed any ..

The British Sea King and Wessex Helicopters

The British Sea Harrier FRS1 and Harrier GR3 Aircraft

The Argentine and British Land Forces

The British Ships and Landing Craft

The Argentine Aircraft


Thank you for reading and I hope that I have passed the audition ....


Wednesday 17 February 2021

Rapier FSA/FSB1

Victory in the Falklands is now on a knife edge. 

It's 21st May 1982 and the British amphibious forces have landed on the beach at San Carlos. The race is now on to deploy a 'mystical' air defence system. The Navy, Marines and Paras want this deployed within the first few hours of landing. The system is the Rapier. 

Without this, it is feared that the landing ships in San Carlos Bay will be sunk by waves of Argentine bombers before they can unload their men and supplies, and the troops on the beach will be forced back into the sea. 

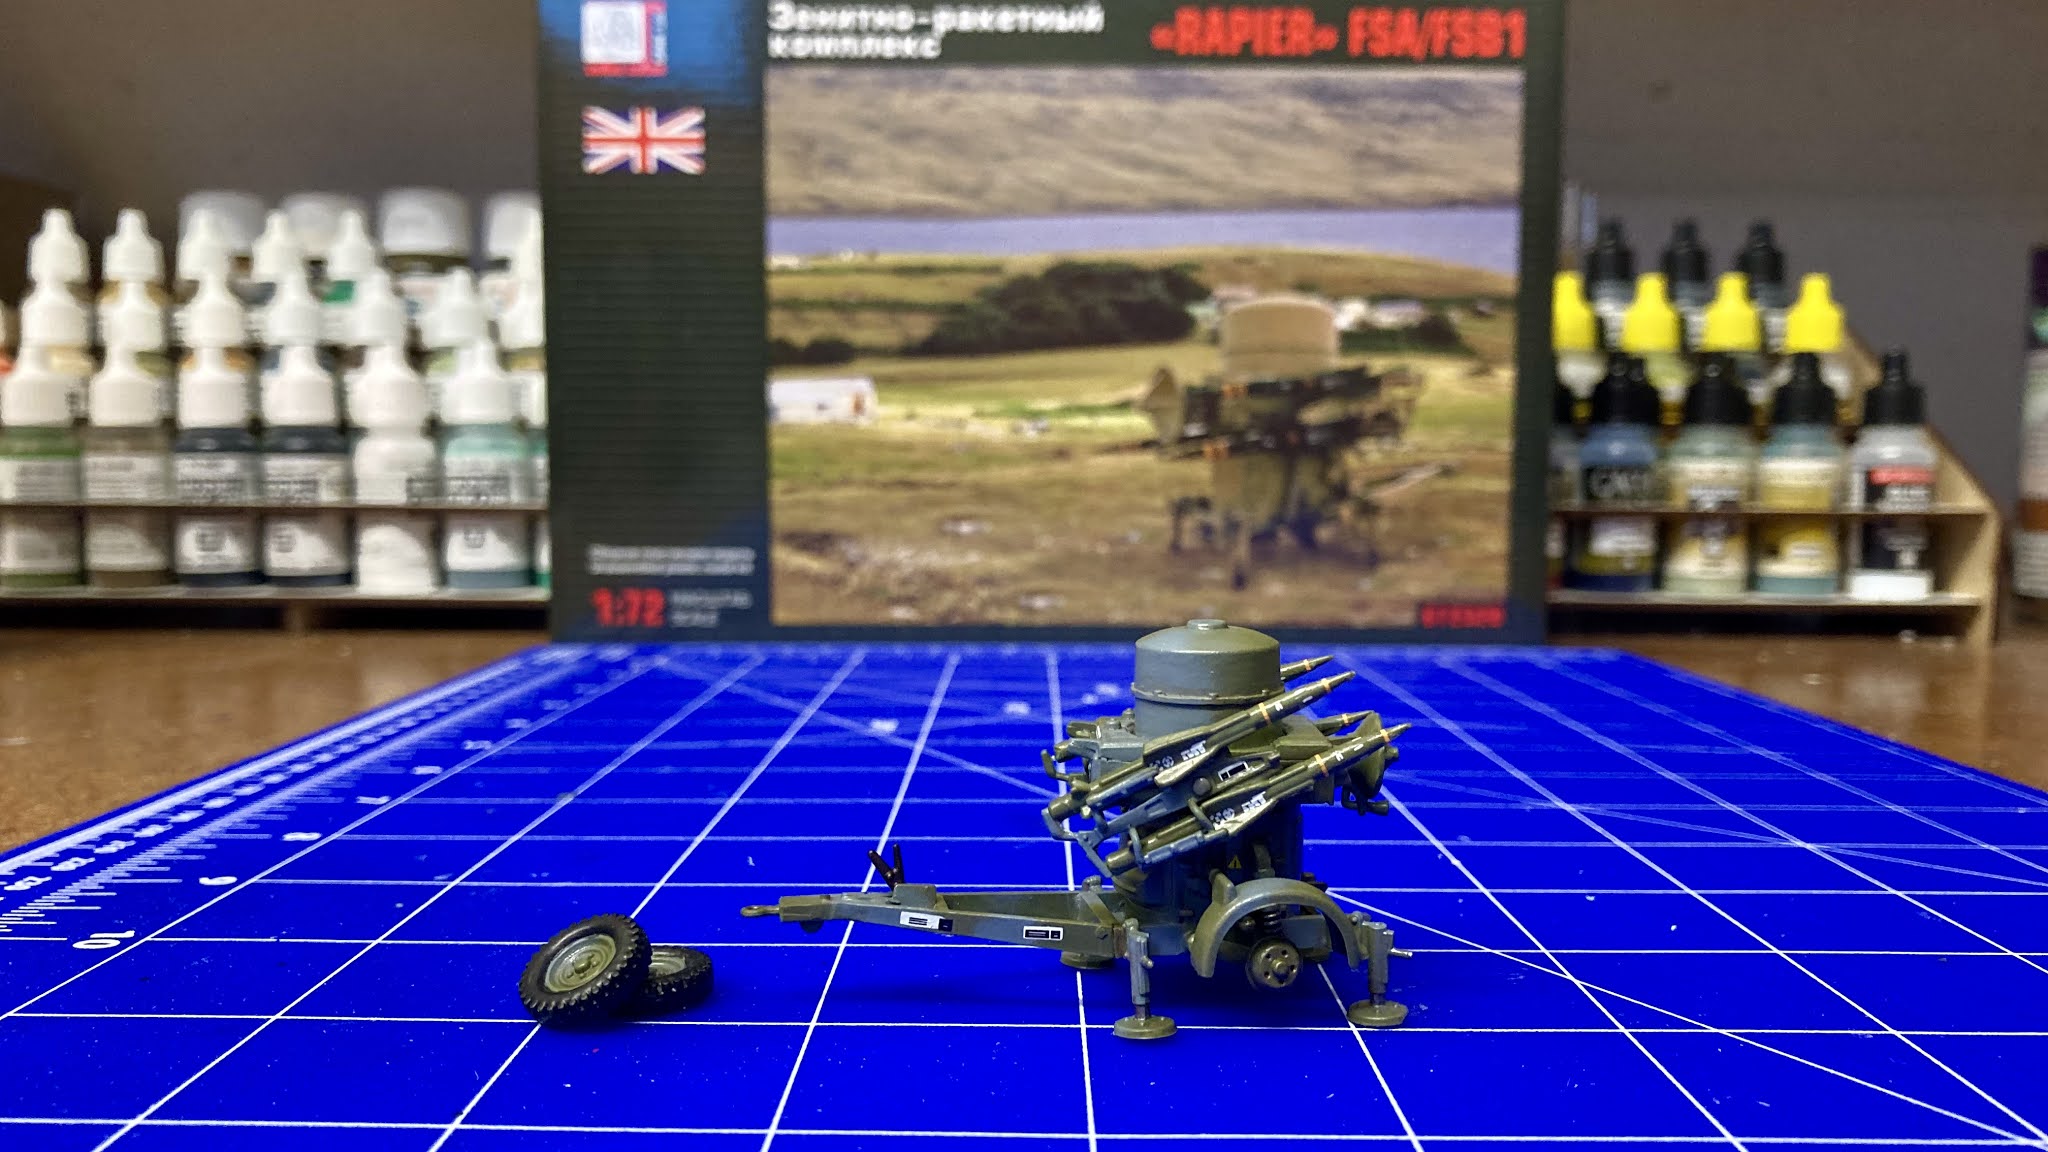
The Rapier was a British surface-to-air missile developed for the British Army and RAF Regiment to replace their Bofors 40/L70 anti-aircraft guns. The original Rapier, as deployed in the Falklands War, took the form of a wheeled launcher with four missiles, an optical tracker unit, a petrol powered generator and trailer of stores. The launcher consists of a large cylindrical unit carrying two missiles on each side, the surveillance radar dish and "Identification Friend or Foe" (IFF) system under a radome on top, the guidance computer and radar electronics at the bottom, and a prominent parabolic antenna for sending guidance commands to the missiles on the front. T Battery of the 12th Regiment Royal Artillery from Kirton in Lindsey joined 3 Commando Brigade as part of the Falklands Task Force, landing at San Carlos on 21 May, with additional support from 63 Squadron RAF Regiment from Gütersloh, Germany.

While there had been discussions on opening a second bridgehead following 21 May landings at San Carlos, it was conceded that there were insufficient Rapier launchers available to give effective protection to a second anchorage. As it was the British had just one Rapier battery of 12 launchers and Battle Group commander, Admiral Sandy Woodward, also saw it vital to protect his ships within the San Carlos area where their own medium-range Sea Dart missiles, effective against long range targets, were unable to engage those at low-altitude, such as Argentine A4 Skyhawk aircraft and Exocet missiles, especially in the confined space of San Carlos Water. 

So, as the landing ship, RFA Sir Galahad, sat exposed in the water off San Carlos, it was a priority to get the Rapier missiles and launchers in the landing craft and ashore.  Regrettably, by prioritising these ahead of the Welsh Guards, awaiting their own slot to disembark, and then the underestimation of the time it would take to get the Rapier set up, opened the door for Argentine Skyhawks to complete and uncontested bombing run on the unprotected RFA Sir Galahad!

The amphibious landing force, together with Admiral Woodward himself, had placed almost mystical faith in Rapier’s ability to provide an umbrella against air attack within hours of the first troops reaching shore. Yet, after all the effort of the LCVPs and Sea Kings to locate them ashore, not only had they been unable to prevent the destruction of RFA Sir Galahad, 8 of 12 the launchers were found to be unserviceable. Long exposure to salt at sea had proved damaging to sensitive electronics and the supply of spares, which had to be flown in from the ships, had to fit in with the schedule of the, already overburdened, helicopter flights and frequent Argentine air attack! This was also exacerbated by the earlier sinking of MV Atlantic Conveyor, which not only lost them the helicopters which were to support their amphibious landing and transportation inland but also almost all of their Rapier spares were on board when she was attacked and sunk..

Things were not much improved even when the Rapier was operational. There was a tendency for the pins securing the missiles to their slides to break, spilling their lethal load to the floor, and most of their operators hadn't experienced a live missile firing in over a year! This meant that such 'mystical expectations' could never be delivered. The task force leadership were, understandably, a little less than satisfied when by the end of that first day, only 3 of the 10 missiles, launched against attacking Argentine aircraft, actually hit their intended target! The main problems were a lack of range and the decision to omit a proximity fuse, which then required the unpracticed operator to strike the target directly with the missile. Rapier also suffered with problems with its IFF system and interference with Royal Navy's radar; not a good mix when you have friendly Sea Harriers in the air and the Bay packed with Royal Naval ships, many of which would have had very active radar!

Fortunately, on the following day, May 22nd, foul weather and low cloud allowed for the enlargement of the beachhead without interference from Argentine aircraft. Rapier batteries were established on the bluffs above San Carlos as the beach head grew to 10-miles-square, and also at the temporary forward operating airstrip once constructed.

Though not particularly effective in terms of number of on target ‘hits’, its presence would have at least acted as a deterrent. There are, not unexpectedly, mixed reports on the number of aircraft claimed by the Rapier. In Max Hastings 1983 book, ‘The Battle for the Falklands’, he suggests that of the 109 aircraft destroyed, 9 were the result of Rapier. Other early post-war reports were even more favourable, indicating 14 destroyed and 6 probables. Later analysis was less rosy, indicating as few as four enemy aircraft were actually downed. Of these, only one Argentine aircraft, a Dagger of FAA Grupo 6, can be confirmed as a Rapier 'kill' when it was brought down on 29th May.  The other three, a A-4 Skyhawk of FAA Grupo 5 on 23 May & two A-4 Skyhawk of FAA Grupo 4 on 24 May and 25 May, were subjected to the full force of the San Carlos Air Defences, with claims going to Sea Wolf, Sea Cat, Blowpipe and small arms, as well as T Battery.

A much uprated Rapier was used during the London 2012 Summer Olympics to provide air-defence security for the games. Rapiers were placed at four sites (Blackheath Common; William Girling Reservoir, Enfield; Oxleas Meadow, Shooter's Hill; and Barn Hill, Epping Forest), fortunately, they were never  called into action and so there is no dispute here, on the number of 'hits' claimed for this Rapier!

My model from the Russian maker Gran Ltd, was a bit of a last minute addition to the collection, mainly because in reading Sandy Woodward’s memoirs of the War it struck me how much personal belief he had to place in Rapier to take the pressure off his over stretched and diminishing Battle Group and how, as with his own ship’s missile technology, it just failed to live up to expectations. This further justifies many observers' view, that without the Sea Harrier the Task Force may never have achieved one of the greatest military actions in living memory! 

There’s not a great deal to say about the model itself. It went together very nicely, albeit the pins securing the missiles to their slides were, very like the original, problematic to keep in place, and the instructions were probably based on the Ikea template. There was one piece totally omitted from the instructions and which I later realised was the plate to secure the two halves together, so that the top missile section could be left unglued to freely rotate. By the time I realised, it was too late and so they sit, one of the other, secured by gravity alone. I scanned the Google archives for the colour scheme used at the time. None were close to being the green and brown, Gran Ltd proposed. I saw mostly shots of all over green or a grey and green camouflage pattern, so went for the latter. It had a good set of decals with spare stripes for the missiles, something I thought was a nice idea, as often these can frustratingly self destruct!

--- 

The Model


Brand: Gran Ltd.
Title: Зенитно-Ракетный комплекс "Rapier" FSA/FSB1 Air defense system
Number: G72320 (Also listed as 72320)
Scale: 1:72
Released: 2017 | Initial release - new tool

Tuesday 16 February 2021

Falklands War Sea Harriers

As the British amphibious group landed at San Carlos, East Falkland, on 21 May 1982, the Royal Navy Sea Harriers flew combat air patrols above. Although the Argentine forces may soon be driven back to Port Stanley and surrender, the Argentine Junter on the mainland did not. This meant that a strong air presence would need to remain long after hostilities ended. Even today, Eurofighter Typhoons fly from the purpose built RAF Mount Pleasant airbase to provide air defence for the Falkland Islands & South Georgia. RAF Mount Pleasant is now home to around 2,000 British military personnel, as much again as was the population of the Falkland Islands back in 1982!

A trio of Sea Harriers

This all began in April 1982 with just 20 Sea Harriers, topped up with a further 8 in mid-May. During the subsequent 100 day conflict, six were lost in accidents or by ground fire, but not one in air-to-air combat.
The ability of the British to retake the Falklands lay in the hands of pilots and aircraft fighting while outnumbered six-to-one, 8000 miles from home. Fortunately, the British had a few advantages of their own. The Argentines had only two aerial refuelling aircraft, the bombing of Port Stanley runway prevented their heavy fighter bombers landing closer to the British Task Force, and their aircraft carrier was forced to return to base after the sinking of the ARA General Belgrano. This meant that only a small number of aircraft could be sent on a given strike, at any one time.

As in all wars, the evolution of fighting equipment accelerates exponentially and the Falklands War was no different. While advancements were proposed and implemented across the whole task force, due to the relatively short conflict, most would only materialise until after the war. One interesting example came from the lack of shipborne AEW platform, which caused major issues in identifying air strikes. As the Task Force was well out of range of any RAF aircraft capable of providing AEW support,  picket ships had to be posted ahead of the fleet to provide early warning of bombing and missile attacks, often resulting in the loss of the ship itself. HMS Sheffield and HMS Coventry were just two such ships lost in this way. In recognition of this issue, Westland were commissioned to attach an RAF Nimrod radar to a Royal Navy Sea King.  To achieve this, they fashioned a swivel arm to attach itt to the fuselage and protected it within an inflatable dome. This allowed the radar to be lowered below the fuselage during flight and for it to be raised for landing. These prototypes, designated HAS2(AEW), were both flying within 11 weeks and deployed with 824 D-Flight on HMS Illustrious. By this time, however, the war was over, but they did return to the Falklands aboard HMS Illustrious in support of the ships, aircraft and troops that were staying on.

Three shades of grey!

The Sea Harrier evolution which most impressed me, meanwhile, was in its use of camouflage .. I’ve always been fascinated by the way camouflage has changed dramatically over the years, but here the changes were played out in fast forward!


Before the outbreak of the War, Royal Navy aircraft were painted dark sea grey with a white underside. This was the Temperate Sea Scheme, thought to be the best camouflage for the European theatre. As the two Sea Harrier squadrons, 800 and 801, sailed to the Falklands aboard HWS Hermes and HMS Invincible, their white undersides were overpainted with the dark sea grey; harder to see, or so they thought, in a Southern Atlantic winter. In the air, however, they appeared so dark that the Argentines called them the ‘Black Death’ .. probably not therefore as camouflaged as they may have wished! Back in the UK, as the newly formed 809 squadron and its oddball selection of Sea Harriers were pulled together, Mr Philip J Barley of the Defensive Weapons Department, Royal Aircraft Establishment (RAE), Farnborough was asked to design their paint scheme. Science took over from history and tradition and the overall Barley Grey camouflage scheme was created. When 809 joined the Task Force and merged with 800 and 801, they were asked to repaint their aircraft in the dark sea grey. Alas they declined, after all, their scheme was haute couture tailored specifically for the season! Interestingly, if you look at most British military aircraft today, they also now wear a similar Barley Grey low visibility camouflage.


Sea Harrier XZ457/14 in the original pre 1982 Temperate Sea Scheme

To illustrate this camouflage story, I just had to purchase another Sea Harrier and create the pre-Falklands look. This kit actually came with no plans nor decals, but having already built 3 in succession, I knew which bits went where, and had many a spare decal for the pre-Falklands variants that I’d not used. Amazingly, I was able to finish it in the early colours of the Sea Harrier FRS Mk1, XZ457/14, which I built in January, painted in its 1982 Falklands War colours as Black 14, the highest-scoring aircraft of the conflict. This aircraft was delivered wearing the code 104 to the Intensive Flying Trials Unit, specifically formed to prepare the new Sea Harrier for service, in January 1980. It was then assigned the aircraft number 14, as seen on the Black 14 model, when 899 NAS was made the operational Sea Harrier squadron and prior to joining 800 squadron aboard HMS Hermes. 

The Squadrons …

800 NAS under the command of Lieutenant Commander Andy Auld, was brought up to its wartime strength of twelve Sea Harriers by transferring four aircraft and their crews from 899 NAS. A further four Sea Harriers and pilots of 809 NAS joined the squadron from the eight which were shipped out to the Falklands in May aboard  MV Atlantic Conveyor  The squadron lost 2 planes and 1 pilot, one when it exploded on takeoff from Hermes and one shot down during an attack on Goose Green. No Harriers were lost in air-to-air fighting and the squadron destroyed 13 enemy aircraft. 


Sea Harrier XZ457/14 'Black 14' in the 1982 Falklands War Scheme

801 NAS under the command of Lieutenant Commander Nigel "Sharkey" Ward, sailed aboard the smaller carrier, HMS Invincible, with eight Sea Harriers and were joined by the remaining four of eight Sea Harriers and pilots of 809 NAS from MV Atlantic Conveyor. The Squadron lost four aircraft and two pilots during the conflict, two aircraft collided in bad weather, another slid off the deck when Invincible turned sharply into the wind and one shot down while on an armed recce


809 NAS Sea Harrier in the new Barley Grey Low Visibility Scheme

809 NAS, as with 899 NAS was split between 800 and 801 for the duration of the war but remained to fly in their unique Barley Grey low visibility camouflage. 

After the war, 809 NAS reacquired its aircraft and crews and returned to the UK alongside 800 NAS aboard Hermes, only to embark aboard the newly completed Illustrious and return to the Falklands so that Invincible could be relieved to return home. 809 NAS was then disbanded in December 1982 on its final return to the UK.  

In September 2013, it was announced that 809 NAS was to be reformed to become the first Fleet Air Arm squadron to be equipped with the F-35 Lightning II. The squadron will operate alongside 617 Squadron of the Royal Air Force as part of the Lightning Force, and will be stationed at RAF Marham when not deployed aboard one of the Queen Elizabeth-class aircraft carriers. Both squadrons will consist of both Royal Navy and Royal Air Force personnel. And yes, I have the kit of the British F-35 Lightning II in my stash and ready for building later this year!

Monday 15 February 2021

Operation Sutton 1982

Operation Sutton was the code name for the British landings on the beaches of San Carlos Water, East Falkland in May1982 as part of Operation Corporate, the overall British operation to retake the Falkland Islands and its territories, following the invasion by Argentine military forces. 

The operation opened on the evening of 19th May with the repositioning of 2000 troops, from SS Canberra to HMS Fearless & her sister ship, HMS Intrepid. At just after 14:00 on the afternoon of 20th May, control of the Task Force passed from Admiral Sandy Woodward's Battle Group and HMS Hermes, to Commodore Mike Clapp's Amphibious Group and HMS Fearless; Commodore Clapp would be leading the next phase, the landing of troops and the retaking of the Falkland Islands.

At 19:00 on 20th May, HMS Antrim and HMS Ardent detached from the Battle Group to both secure access to Falkland Sound and make the Argentines think the landings were happening anywhere but in San Carlos Water! At 22:00 Wessex helicopters from HMS Antrim dropped SBS troops to remove the Argentine forces guarding the lead into San Carlos Water, high on Fanning Head. 

Just before 02:00 on 21 May, HMS Fearless steamed into Falkland Sound, one mile ahead of HMS Intrepid. 30 minutes later HMS Fearless opened the stern gates of her flooded docks and 4 loaded LCVP (Landing Craft Vehicle Personnel) pushed out into the sea. There were now 11 ships deployed around the north-western shores of Falkland Sound either preparing to disgorge troops or preparing to bombard Argentine positions. At 03:50 HMS Antrim opened fire on Fanning Head with 250 shells in less than 30 minutes. Meanwhile, at around 07:30 the LCVPs from HMS Fearless packed with 40 Commando (together with a Scorpion and  Scimitar tank) and landing craft from HMS Intrepid with Colonel H Jone’s and 2 Para, offloaded their troops on the north and south beaches of San Carlos Water. There was very limited enemy resistance as 40 Commando ran up the first Union Jack to fly in San Carlos Settlement since the 2nd April invasion

The landings, sparked a strong reply from the Argentine’s airforces and led to the Battle of San Carlos  between aircraft and ships that lasted from 21 to 25 May 1982. Low-flying land-based Argentine jet aircraft made repeated attacks on ships of the British Task Force, which, because of its ferocity and damage sustained to the fleet, became better known as the “Battle of Bomb Alley”.  This was the first time in history that a modern surface fleet armed with surface-to-air missiles and with air cover backed up by carrier-based aircraft defended against full-scale air strikes. The British sustained losses and damage but were able to create and consolidate the beachhead and land troops. The actions had a profound impact on later naval practice. During the 1980s most warships from navies around the world were retrofitted with close-in weapon systems and guns for self-defence. 

The opening day of Operation Sutton was the largest amphibious action by British forces since the 6th June 1944 landings in Normandy, and is obviously why I also frequently see the word D-Day used for the 21st May 1982 Falklands landings. As in 1944, the only way to get a large number of troops and equipment from their ships to shore was by landing craft. The LCVP Mk2s which sailed from Fearless class amphibious transport docks, could carry 35 fully equipped Royal Marines Commandos or two Land Rovers. Meanwhile, the Higgins LCVP, as I have used in my Operation Sutton build, was a US World War II variant, typically constructed from plywood, and could carry roughly the same complement of troops or a 3 ton vehicle, so very close to HMS Fearless’s Mk2s. However, while my maths was never the best, I don’t quite see how a 9 ton Scorpion/Scimitar would be carried in even the Mk2, but for illustrative purposes, if nothing else, I have camouflaged my model of Airfix’s Higgins LCVP, in the white tiger stripes as used for the landing and there is just enough room for a Scorpion/Scimitar tank, even if its weight would probably sink it!

The Scimitar and Scorpion CVR(T) - Combat Vehicle Reconnaissance (Tracked) served with two troops from B Squadron, Blues and Royals who were equipped with four tanks each. These were the only armoured vehicles used in action by the British Army during the conflict. Having previously made the Scorpion variant from an original 1975 Airfix kit, I managed to acquire a 2005 reissue to build it up as the Scimitar. The Scimitar is very similar to the Scorpion but carries the 30mm RARDEN cannon as its main weapon rather than the Scorpion’s shorter barrelled low velocity 76mm main gun. At least one Scimitar was seriously damaged by an Argentinian landmine, but the crew were unscathed, and the vehicle was salvaged by Atlantic Conveyor’s only surviving Chinook HC.1 helicopter and soon brought back into service. Scorpion and Scimitar tanks also provided air defence support with machine guns and 30 mm guns; on 23 May 1982, a Scimitar claimed the only tank to aircraft hit on a Skyhawk at 1,000 m.


---

The Model Kits ...


Brand: Airfix
Title: Higgins LCVP
Number: A02340
Scale: 1:72
Type: Full kit
Released: 2019 | Rebox (Unknown what changed)


Brand: Airfix
Title: Scorpion / Scimitar Tank
Number: 01320 (Also listed as A01320)
Scale: 1:76
Type: Full kit
Released: 2005 | Rebox (Changed box only)

Sunday 14 February 2021

Type 21 Amazon-class Frigate

This is going to be the last week of my Falklands War project, which reaches its crescendo with the British forces landing at San Carlos and me closing my scale model builds with some of the ground forces and support ships which completed the retaking of the islands. 

Today’s offering is my 3rd Royal Navy ship which served in the Falklands War. The Type 21 frigate, or Amazon-class frigate, was a general-purpose escort ship. It was designed in the late 1960s as one of the first fully gas turbine-powered ships. 8 in all were built through the 1970s and served throughout the 1980s into the 1990s.

HMS Amazon (Airfix’s chosen vessel for their 1972 kit)

The frigate’s top speed of 37 knots (69 km/h; 43 mph), impressive handling and acceleration, prompted the class nickname of "Porsches". Not surprisingly, the captains of these ships became known as "the boy racers”! It also had a range of 6,000 nautical miles (11,000 km; 6,900 mi), and moderately good armament of the new Mark 8 4.5-inch (114 mm) gun, facilities for a Westland Lynx helicopter, anti-ship missiles and two triple lightweight Seacat short-range surface-to-air missile  missile launchers. 

With the exception of HMS Amazon (Airfix’s chosen vessel for their 1972 kit), the remaining 7 Type 21s took part in the Falklands War as the 4th Frigate Squadron, these being: HMS Antilope, Active, Ambuscade, Arrow, Alacrity, Ardent and Avenger. Each were involved in a number of battle fleet roles: performing shore-bombardment missions and providing anti-submarine and anti-aircraft duties for the task force. 

The decals included with the Airfix kit were for HMS Amazon, so I left them in the box

On 10 May, having no minesweepers in the task force, a Type 21 was called on to perform a most unusual task. Battle group commander, Admiral Sandy Woodward, rang through to Commander Christopher Craig of HMS Alacrity to go and probe Falkland Sound at night to see if there were any mines. The fear was that having already seen them being laid around Port Stanley, if found here too, they would impede the planned the D-Day landings. As any mine found would have likely sunk the vessel, one of her sister ships, HMS Arrow, was sent to accompany her to pick up any survivors! Alacrity, however, found no mines but did engaged and sink an Argentine naval supply vessel located while in the Sound. Then, on exiting at daybreak, both Alacrity and Arrow were attacked by the Argentine submarine San Luis, which fired two torpedoes; one hit Arrow's submarine towed decoy (as intended) and the other bounced off her hull, having failed to arm itself. 

Not all of the Type 21s survived the War. Ardent was hit by bombs dropped by Argentine aircraft on D-Day, 21 May, while engaged in a diversionary bombardment operation, and consumed by fire. Antelope was then hit by bombs on 23 May, one of which was set off by the bomb disposal team attempting to defuse it on 24 May, causing the ship to catch fire and setting off her magazines, resulting in her breaking her back and sinking.

HMS Ardent was hit by bombs dropped by Argentine aircraft on D-Day, 21 May

The Lynx HAS.2 ASW variant, as carried by the Type 21s, also participated in combat operations. A combination of the Lynx and Westland Sea King helicopters were used to maintain continuous anti-submarine patrols in order to protect the British task force offshore from the Falkland Islands. On 3 May, a Lynx from HMS Glasgow conducted the first combat-firing of a Sea Skua missile, firing on the Argentinian patrol boat ARA Alférez Sobral, inflicting considerable damage to the vessel. I’m Although none were shot down in combat, a total of three were lost aboard vessels that were struck by attacks from Argentine aircraft, these vessels being HMS Coventry, HMS Ardent and SS Atlantic Conveyor.

The Lynx HAS.2 ASW variant, as carried by the Type 21s

In addition to the dangers and damage brought on by the conflict, all the Type 21s started to develop cracks in their decks during the campaign. Due to the different expansion properties of steel and aluminium, a vulnerability particularly demonstrated under the severe weather conditions that they encountered in the South Atlantic. Steel reinforcing plates were eventually fitted down the sides of the ships to keep them afloat and to allow the eventual sale of the six surviving Type 21 frigates to Pakistan in 1993–1994!

As the decals included with the Airfix kit were for HMS Amazon, I decided to leave them in the box and thus allow me to view the finished model as any of the 8 siblings. Then looking at how yellow they had turned since being printed some 50 years ago, I also decided to hand paint the helicopter landing pad markings.


I actually completed this kit before Christmas and before starting on Invincible and Fearless. It was its rather subdued paint scheme, with lack of weathering, which encouraged me to get more adventurous on the other two!

This was a very simple kit to build, hardly worth the premium I paid for such a rare Airfix model, and not my finest by far, but I really wanted to add it to my growing Falklands War collection!


-------

The Kit:

Brand: Airfix
Title: H.M.S. Amazon
Number: 02204-6 (Also listed as F7S)
Scale: 1:600
Released: 1972 | Initial release - new tool

Thursday 11 February 2021

Harrier GR.3

The 1982 Falklands War started on the 2nd April when Argentina invaded the Falkland Islands. The UK response was to assemble a military task force, which was predominately comprised of a Royal Naval Battle Group and combined Army and Navy Amphibious Landing force. The RAF at the time had committed to provide air support, anywhere in the world, and it was this commitment which led to the latest round of defence cuts proposing to sell off the UK’s last aircraft carriers. Only a few ever considered a need to have UK forces engage in a conflict 4000 miles from home, in the South Atlantic, and so when the British islands of South Georgia and the Falklands were invaded, only the Royal Navy had the wherewithal to respond. 

Harrier GR.3 1(F) RAF Squadron 1982

The RAF did however attempt a number of innovative missions to support the cause. With the UK having to rely on very limited, if any, access to US satellites, a pair of 39(PR) Squadron’s photo reconnaissance Canberra PR9s were prepared with Chilean Airforce markings and readied to fly to Punta Arenas, Chile, for Operation FOLKLORE, a covert operation to provide the task force with photographic intelligence on Argentine military targets. Meanwhile, under Operation ACME, 52 Squadron’s R1 Nimrods, peppered with aerials, antennae and receivers which could intercept enemy communications and identify air defence radars, were readied to fly to San Felix Island, some 500 miles west of the Chilean mainland. And on the 1st May, just as the Battle Group arrived in shooting distance of the Falkland Islands, the first of 7 Operation BLACK BUCK missions were flown from the Ascension Islands by Vulcan bombers against Argentine targets on the Falklands, the first being to bomb Port Stanley’s runway to prevent its use by fast jets, such as the Exocet carrying Super Etendards.

Harrier GR.3 operating from Port San Carlos temporary forward operational airstrip 

Without use of an airfield or super sized aircraft carrier, which only the US now possessed, it was impossible for the RAF to provide any fast jet interceptors, such as the Phantom F4. It did, however, have the Harrier GR3. This 1960s developed, single-engine, single-seat, close support/reconnaissance/fighter aircraft with vertical/short takeoff and landing capability, similar to its Navy cousin, the Sea Harrier (SHAR), could land on and take off from the task forces' small Invincible class carriers, or operate from temporary forward airstrips. Therefore, when the call came to provide replacements for those SHARs anticipated to be shot down in the early days of the conflict, and with the Royal Navy having already sailed to the Falklands with their only operational aircraft, 1(F) RAF Squadron offered up 16 of its Harrier GR.3 force for the operation. 10 flew to direct to Ascension, to join Atlantic Conveyor and the newly formed 809 NAS, with a further 6 following a month later.

Although originally fitted with air to air Sidewinder missiles, the GR.3 was never required to support the SHAR on CAP (Combat Air Patrol) but instead were utilised in their more traditional ground attack role. Loaded with rockets, 1000 lb bombs, cluster bombs, and new laser guided bombs, they launched attacks against Argentine positions near Stanley, on the airfields, on Mounts Harriet, Longdon & Tumbledown and on Sapper Hill. They also ran the gauntlet of anti aircraft fire in numerous and vital, low level photo reconnaissance missions.

Originally shipped to the Falklands with Sidewinder missiles, bombs were its weapons of choice 


On the 21st May, the amphibious force landed at Port San Carlos (located on the west coast of East Falkland), and by 2nd June a temporary 260 m long forward operating airstrip had been constructed, enabling the GR.3s to leave the control and confines of HMS Hermes to operate from a location much closer to the front line. For the first time since leaving the UK, they could also now use their FINRAE (Feranti Inertial Rapid Alignment Equipment), the sophisticated weapons control and head up display (HUD) system, which could not be made to work flying from the moving deck of an aircraft carrier! The 10 Harrier GR.3s, which saw combat up until the Argentine’s surrender on 14th June, completed 126 sorties with 4 losses:


  • Friday 21 May Flt Lt Glover was shot down over Port Howard, West Falkland, probably by Blowpipe SAM; he ejected, was injured and was taken prisoner-of-war. 
  • Thursday 27th May - Sqdn Ldr Iveson was shot down over Goose Green, probably by 35mm Oerlikon anti aircraft fire; ejected, evaded capture and was later rescued.
  • Sunday 30th May - Sqdn Ldr Pook RAF's Harrier incurred damage from small arms fire, near Stanley, then ran out of fuel short of HMS Hermes; ejected and was picked up east of the Falklands. 
  • Tuesday 8th June - Wing Cmdr Squire landed heavily at Port San Carlos with partial engine failure. His Harrier was damaged beyond repair but he escaped unhurt. 

GR.3 XZ992, the aircraft number on my Italeri model kit, was delivered to the RAF on 18th February 1982 and was flown out to HMS Hermes on 1st June, as part of the second wave of 6 replacements. Unfortunately, although it probably saw little action, it was the 5th GR.3 destined not to return to the UK:

  • 28th November 1984 - Flt Lt Ian Wilkes struck a large sea bird, probably a Southern Giant Petrel, while practising an attack on Port Stanley airport. He ejected at very low level, with insufficient time for the parachute to slow him down, and suffered serious injuries but was saved from drowning by two airmen who were working nearby and came to his aid.
Italeri 1:72 scale Harrier GR.3 'Falklands war' Aircraft No. XZ992

While this first generation of Harriers did not see further combat with the RAF after the Falklands War, a detachment of six Harrier GR.3As from No.1453 Flight RAF was established at Stanley airport, which became RAF Stanley, part of BFFI (British Forces Falkland Islands). After the arrival of No. 29 Squadron RAF, with their F-4M Phantom FGR.2s from Ascension Island in October 1982, just as during the 1982 conflict, 1453 Flight's mission was focused more on ground attack missions. In June 1985 the Harriers finally left the Falkland Islands' air defence to the Phantoms of 23 Squadron, which had relieved 29 Squadron in October 1983.

RAF operations were moved from Stanley airport in 1986 to the purpose built RAF Mount Pleasant. From here, it is No.1435 Flight RAF, flying the Eurofighter Typhoon FGR4, who continue to provide the air defence for the Falkland Islands & South Georgia.  RAF Mount Pleasant is amazingly home to around 2,000 British military personnel, as much again as was the population of the Falkland Islands back in 1982!

-----


The model:


Brand: Italeri
Title: Harrier GR.3 Falklands war
Number: 1401
Scale: 1:72
Released: 2017 | Rebox (Changed decals)

Ice Cold In Alex "Katy"

My third Airfix Austin K2 Ambulance build, I just love this kit. This one is inspired by the 1950s classic book and film “Ice Cold In Alex”....