Saturday, 18 November 2023

Rhubarb over Somerset

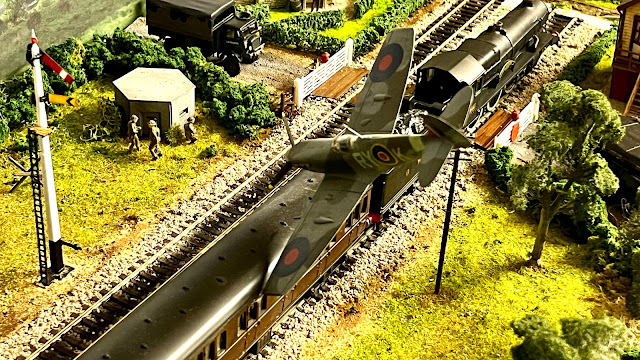
After more than 2 months in the making my “Rhubarb over Somerset” diorama is done. If it were to be displayed anywhere I’d add a frame and plaque but over time it will probably be dismantled and its parts repurposed for another creation as it is the building that I find most fun. 

The inspiration for this diorama is a mysterious incident which occurred 80 years ago in Somerset not far from where we live. It was on a summer morning of 4th June 1943 that a Czech fighter pilot of 313 Squadron stationed at RAF Church Stanton (renamed RAF Culmhead in December 1943) clipped the roof of a GWR railway carriage with the wing of his Spitfire Mk.Vc, causing him to tragically crash in a farmer’s field near Bradford on Tone. 

During this period of WW2 the squadron was engaged in ‘Operation Rhubarb’, offensive low-level sweeps over northern France harrying ground targets such as military convoys and trains. It is possible that this pilot was at the time of the incident practicing a low-level attack on a passing locomotive and approached too low to clear the carriages. 

In creating this diorama I’ve incorporated a number of images from the period which although having no historical link to the event of the 4th June could well have been seen at some time or another in the Somerset countryside during the summer of 1943. Look out for the men of the Home Guard manning a pillbox along the Stopline Way, originally built to prevent a German beach invasion getting to London.


The Tank Regiment’s 11th Armoured Division are on the move from Bovington Camp, the Armoured Fighting Vehicles School, preparing drivers, gunners and engineers for D-Day. On the railway bridge a Scammell tank transporter carries a ‘Hobart Funny’, the Churchill Bridge Layer (coincidentally Percy Hobart was the first commander of the 11th Armoured Division when it formed in 1941), while, in the absence of signposts, a group of officers are having to check their map for directions. 

Meanwhile, a farmer shares a cup of tea with a soldier from 88 Brigade Workshop (REME) while a boy watches on sat on a milk churn. 

The railway signalman chats with a fellow soldier while he waits for the train to pass so that the rest of the convoy can proceed over the Bradford level crossing. I like to imagine that the tank transporter should be part of this convoy but they got separated hence now being lost! 

The stars of the scene are the Castle Class locomotive which I’ve repainted in a drab GWR wartime livery and a couple of clipped wing Spitfire Mk.V in RAF Church Stanton markings. The wings are clipped as this configuration was found to improve manoeuvrability at low level. 

Phew!

For those interested, here’s a list  of the 20+ models and figures I’ve used in the making of this diorama:

Airfix 1:72 Spitfire Vc, 1:76 Scammell Tank Transporter, Churchill Bridge Layer, Bedford QLT & QLD Trucks & Willies Jeep. 

Modelu military, farm and railway figures 

Ratio Plastic Models 1:76 Telegraph Poles, Crossing Gates, GWR Signals & Signal Box

Metcalfe 1:76 Stone Style Railway Bridge, Manor Farm House & Pillbox. 

Peco 1:76 Lamp Hut & Wooden Sleeper Tracks. 

Ancorton Models 1:76 Anderson Shelter.

Wednesday, 15 November 2023

Bedford QLD and Bedford QLT

Here are my completed models of the Bedford QLD and Bedford QLT from Airfix’s 2010 tooled 1:76 kit. Many different body styles were designed for the QL chassis and it is the QLD general service truck and QLT "Trooper" troop carrying vehicle that have been provided in this kit. 

While an impressive set of decals are supplied for a variety of different regiments there is unfortunately little historical explanation as to which to use. After some research and personal choice, I have selected for both trucks the markings of 88 Brigade Workshop (REME), a regiment with whom I’m proud to say my father served. And, as I acquired these to play a key role in my “Somerset Rhubarb” diorama and with the Tank Regiment base at Bovington being a shortish drive down the road, it made sense to me to have them attached to the 11th Armoured Division, which, formed in 1941, were responsible for many victories in the Battle of Normandy through to the crossing of the Rhine in 1945.


The Royal Electrical & Mechanical Engineers (REME) were formed on 1 October 1942 following the observations that Rommel’s swift advance towards Egypt owed much of its success to the German maintenance crews who mended both German and British tanks on the battlefield and sent them back into action within a few hours. Prior to mechanical maintenance of the Army’s equipment being centralised under the command and control of the REME, responsibility was inefficiently being shared between the Royal Army Ordnance Corps (RAOC), the Royal Army Service Corps (RASC), Royal Engineers (RE) and Royal Armoured Corps (RAC). Mike Sibbons, ex REME and Archivist at the REME Museum, wrote in his 1988 book on the REME ‘From the Archives’, that “Already, within a few months of formation, this new British Army organisation had triumphed in the Middle East campaign. Never before in British history has an army fought with more efficiently maintained equipment”.

A REME Brigade Workshop consisted of 272 officers and men and 97 vehicles organised into 4 echelons of repair. These were: 1st echelon Light Aid Detachment (LAD), 2nd echelon Mobile Workshops, 3rd echelon Semi-Mobile Workshops and 4th echelon Static Based Workshops. My trucks are intended to be part of the 2nd echelon Mobile Workshops Light Aid Detachment (LAD) which deployed with the tanks, artillery regiments and infantry brigades, equipped to carry out light repairs, replacements and recovery of equipment in the field. Using artistic licence rather than on this occasion any scratch building skills, it is my assumption - based on historical photographs - that the QLT is close enough to a REME workshop lorry as used by the LAD, and I need make no changes to the QLD which is perfect in its predetermined general service truck role. 

The build and detail in these kits is very presentable for their scale and price, although I did decide to not use the glazing provided due to its totally  unrealistic thickness. I could have used a piece of clear plastic sheet but thought I’d try an application of Krystal Klear which, although it was more than capable of filling the required area did, due to the size of the window frame, dry a little bit like a concave lens. I still think they look good enough though 

Curtiss Tomahawk Mk.II

Build No.3 of 2025. This is Airfix's 1/48 scale Airfix P-40 Tomahawk MkIIB.  I've completed the build in the colours of AK128 BT-H, ...