Thursday 29 October 2020

Westland Sea King HC.4 & HAS.2 (HAR.3)

This week’s scale model is a little different … 4 weeks ago I set out to build two Falklands War Sea King helicopters, the HC.4 Commando and the HAS.2 Anti-submarine variants. It has been the most absorbing build of my lockdown modelling projects to date. Working on them side by side has both been a real challenge and a journey of discovery. My reason for choosing two, was to build the two distinct Royal Navy Sea King variants which were uniquely used together during the Falklands War. These were the HC.4 Commando and the HAS.2 Anti-submarine.

Both of the base models I used were from Airfix's current range, a rarity in itself as I've more recently had to delve into their discontinued range. Airfix's Westland Sea King HC.4 was a perfect match for the Commando, while their Westland Sea King HAR.3 Starter Set was the closest I could find to the HAS.2 Anti-submarine. While the HAR.3 was actually the RAF's Air Sea Rescue helicopter of the day, the most important feature of this version which I needed for my Anti-submarine helicopter, was its radar dome, however,  I later noticed it also had rear observation windows which were not installed on the Anti-submarine!  Frustratingly, considering all the other research undertaken, I realised this far too late in the build to to make any adjustments, so I ask you to just ignore them, albeit I find this hard to do myself, as they did cause some further issues which I'll explain later.

As this was such an epic build and I have so much to comment on I'm going to share the story of these helicopters in three instalments. In this post, I'll bring you some of the key features of the early stages in which I was constructing the two models side by side, and then, just as I've done in my previous posts, I'll deep dive into the helicopters' backstories and the more unique parts of each build.

For consistency, I will now reference the HC.4 as just the Commando and the HAS.2 as the Anti-submarine. Hopefully using these names will, at least, be less confusing than their type numbers.  

Phase 1 - The Interior

Unwrapping both models and laying the contents out on the desk showed that most of the parts were the same. However, once I started the construction, the variety of parts used, and the number which were not required, was quite surprising. The Commando's interior was just two rows of seats, understandably when considering it was designed to carry up to 27 fully laden troops. Meanwhile, the Anti-submarine, in place of seats, had computer cabinets and a desk with a radar monitor, obviously required to track and sink submarines. An interesting factoid is that once the Argentine submarine threat was neutralised, all this technology was removed to make room for cargo, as the movement of supplies between ships and out to the Islands became an essential role for the helicopter fleet.

Interior views

It was also interesting to see how the two helicopters were fitted out in different coloured seats. I've not been able to find out why, but the Commando had French blue fabric for all but one seat at the rear which was orange! Meanwhile, the Anti-submarine's interior was wall to wall light grey. As I had no other plans to work from, I made a big leap of faith in that the Air Sea Rescue's interior designer was the same as on the Anti-submarine's and a bit of Googling did nothing dispel this!

Phase 2 - The Exterior

When it came to the exterior the differences were equally unique. The Commando has wheels attached to a simple small wing section, while the Anti-submarine has a set of floats attached to the wing into which the wheels retract during flight. Oh yes, and as I commented on earlier, the Anti-submarine also had that 'dromedary' hump on its back enclosing its radar. 

The differences between the two also extended to the exterior paintwork. The Commando, due to its land based role, has an allover matt green camouflage, where as the Anti-submarine has its external surface pained a gloss dark blue-grey; a better camouflage for life at sea. A very good friend, who served on the Sea Kings during the Falklands War, remembered that the paintwork could sometimes look almost black and so after the first coat of light grey, to identify areas requiring filling, I applied a coat of black primer to give the final blue-grey finish an even darker hew. The Commando likewise, received a coat of olive drab prior to adding the British camouflage green. I have recently found that using complementary coloured primers can provid for a richer depth of colour in the final finish. I'm learning every day.

Primer added to complement the final colours

Final colours added

Next up was the layer of varnish. I brush painted the matt varnish on the Commando, having previously found this to give a good and smooth enough covering. Applying a gloss coat is normally a different matter and after loading up the spray gun, the fun started! For the first time, Valejo's airbrush compatible paints failed me miserably. Their gloss varnish was too thick, clogging the brush and even when thinned sufficiently to produce a spray it left an orange peel effect on the surface! This is probably just user error but having never had any problems with Humbrol's simple spray cans, this was a real disappointment. Interestingly on the forums, I've read since, most recommend .. and wait for it .. Pledge Floor Gloss over Vallejo's gloss varnish. So, order placed!

Removing the masking from the glass

Once varnished, the masking on the glass could be removed, and there was a surprising amount of this! I started masking by cutting tape to fit, which is what I've seen most modellers use, but soon resorted to masking fluid, a new favourite of mine dating back to when I used to do a lot of water colour painting. The fluid can be painted on, so one has to have a steady hand which is not so important with tape, and then it peels off like an Ethan Hunt latex mask; very satisfying!

One thing you'll notice from the above picture is the green glass above the windscreen. This on the full sized helicopter is to protect the crew from the sun streaming in overhead, just like a car's sun visor. I applied this to the underside of the glass pieces using a recent discovery of a mix of Vallejo's clear green, blue and grey paint, mixed to a formula I devised for the Huey's.

Phase 3 - The Decals or Transfers

The Commando needed no additions or changes to those Airfix provided, as I decided early on that I'd go with whatever they had designated for the all over green camouflage version. I did have the option to apply an arctic 'green & white tiger' camouflage, but not being a scheme used in the Falklands War, the decision was easy, my Commando model would be Sea King ZA314 of 848 Naval Air Squadron (NAS).

Decals for the Anti-submarine model was a different matter. With the source Airfix kit being a RAF Air Sea Rescue helicopter, few of the decals could be reused. My aim here was to recreate, as close as possible, one of the Sea Kings my good friend worked on when serving with 824 Squadron. This resulted in me having to acquire 3 additional sets to compliment those generic decals supplied with the model. It's amazing what you can find in the after sales market to model a specific subject. I'll go into more detail on what these decals were when I cover the finishing of the Anti-submarine in one of the next 2 posts, though in the picture below you can get a taster for both with a few of their decals applied. 

First set of decals added

Phase 4 - The Crew & Figures

For some reason, Airfix seem to be following Italeri's lead these days in providing no figures for their models. Fortunately the Belgium scale model company, PJ Production, make an excellent range of resin figures and coincidentally, if you were paying attention at the start, the most suitable helicopter crew they make are badge air sea rescue

Bulk buy of resin helicopter crew 

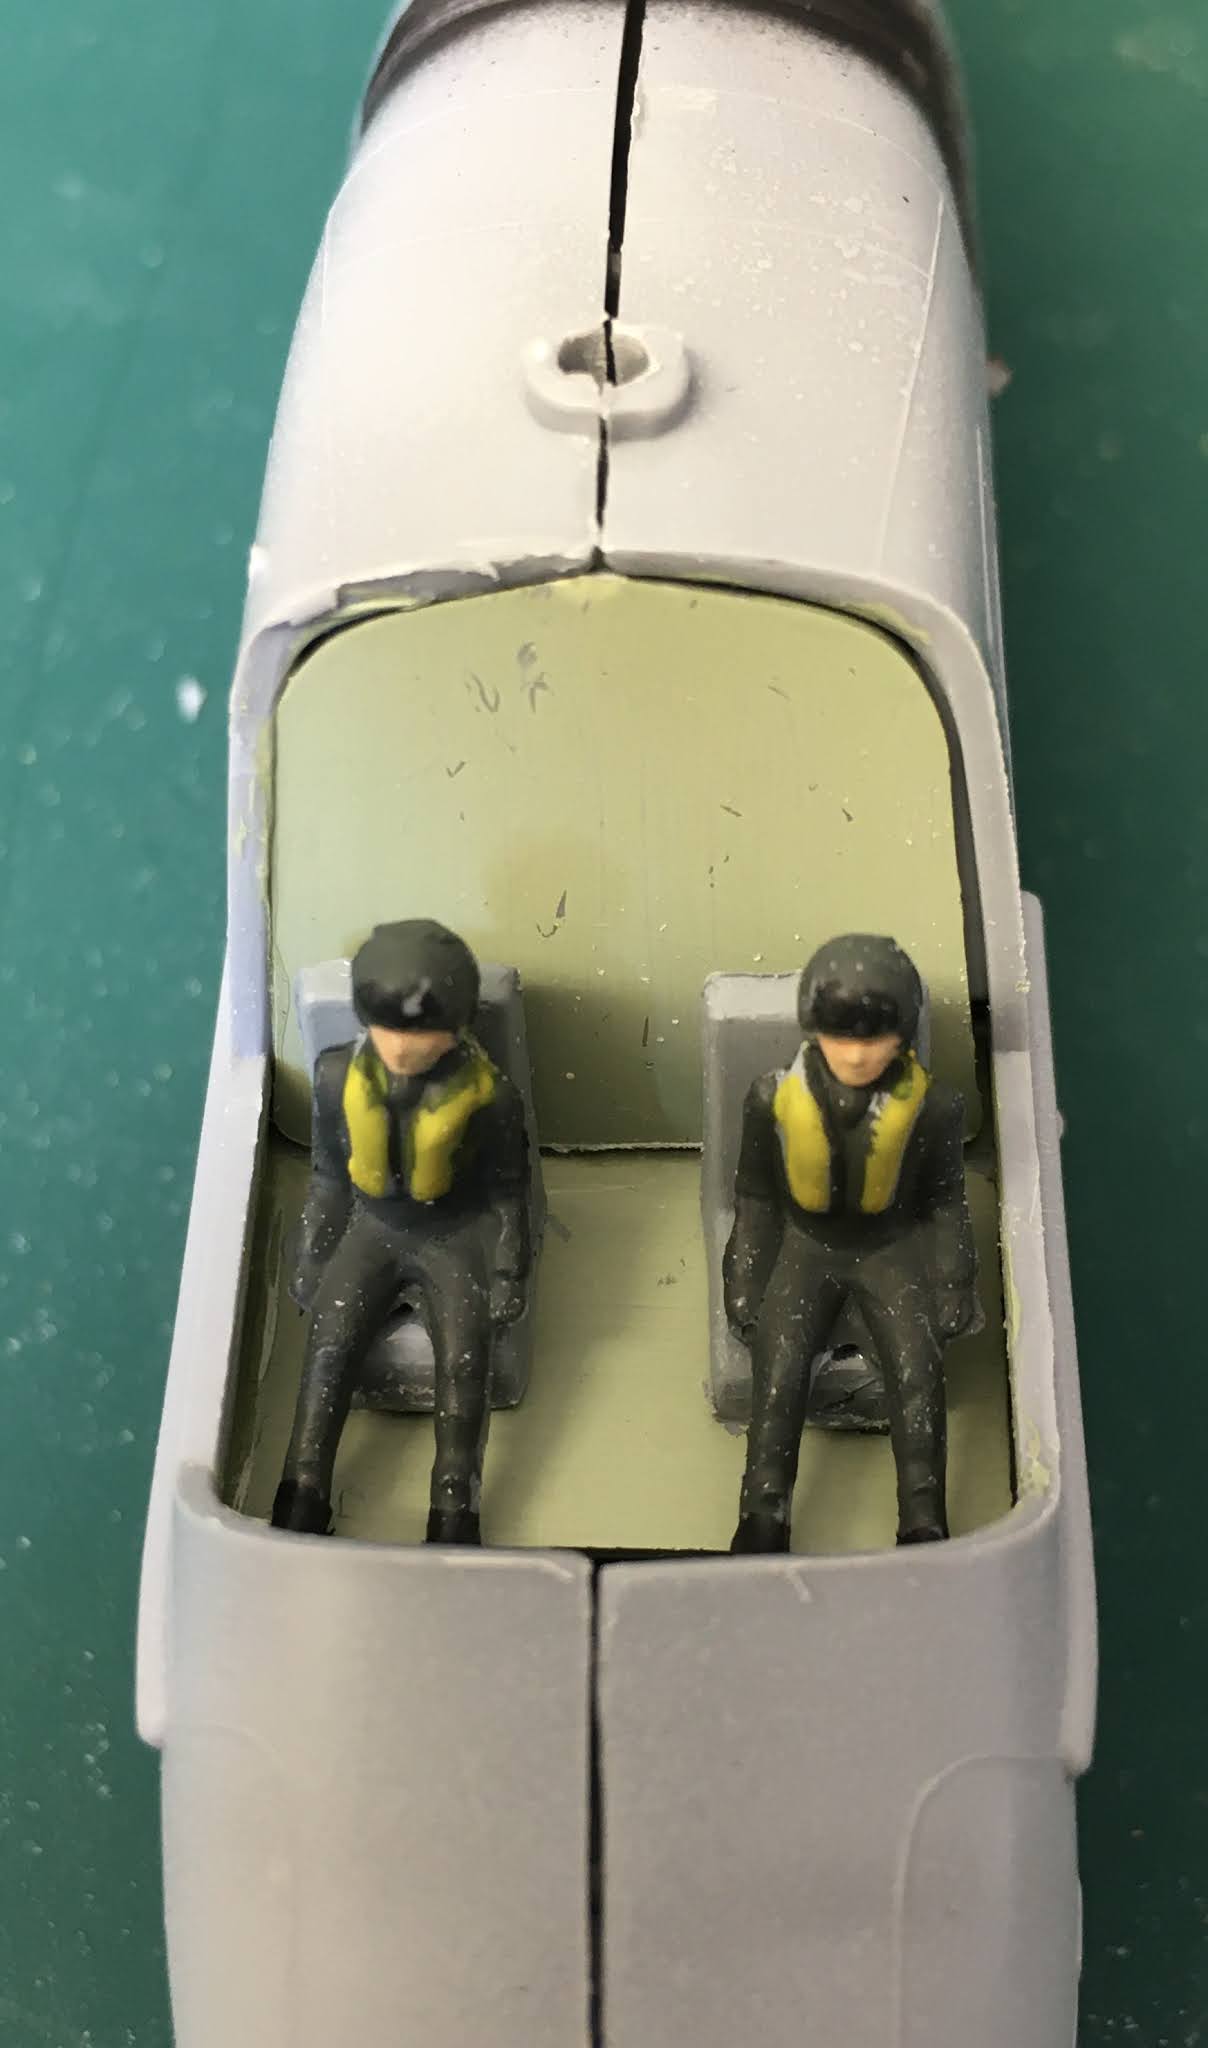
Apart from the bright orange flying suits, which I did not copy, they were a perfect fit for both Sea Kings. While you'll see them in action in my next posts, I've included a preview shot below of the pilot and co pilot installed, prior to hiding them behind their canopy; always a sad time after all that painstaking detail has been applied!

Helicopter crew installed prior to hiding them behind the canopy

The final ancillary figures, important for that final diorama stage of the build, were sourced from Italeri's 1980s NATO Troops and NATO Pilots and Ground Crew sets. 

One of the ground crew modelled on my good friend and conker provided for size!


Some of Italeri's NATO Troops dressed up as 3 Para

So that's about it for now. I hope this has whet your appetite to see more. The Sea Kings are now built and ready for their grand unveiling. All I need to do now is add pictures and backstories to 'paper', which I'll share in my next 2 weekly instalments. 


-----------

The models


Brand: Airfix
Title: Westland Sea King HC.4
Number: A04056
Scale: 1:72
Type: Full kit
Released: 2015 | Initial release - new tool


Brand: Airfix
Title: Westland Sea King HAR.3 Starter set
Number: A55307
Scale: 1:72
Released: 2016 | Rebox (Updated/New parts)


Brand: Italeri 
Title:  NATO Pilots and Ground Crews ex. ESCI
Number:  1246
Scale:  1:72
Released: 2004 | Rebox


Brand: Italeri
Title: 1980s NATO troops
Number: 6191
Scale: 1:72
Type: Figure
Released: 2019 | Rebox (Changed box only)

Friday 23 October 2020

Avro Vulcan B.2

For this week's Falklands War themed model, I have built perhaps the largest 1/72 scale kit around, that being Avro Vulcan. This is, however, not technically a new build but one I built 10 years ago and which, over the last few weeks, I've sanded down, re-painted and applied new decals. Having been suspended above a 007 inspired Scalextric track, now repurposed for my diorama canvases, it had faded badly. Funny thing is that it could very well be returning to the loft rafters, albeit now hung above a Falklands War scene!

Before the makeover 

The Vulcan entered service with the RAF in 1954 to provide Britain's independent nuclear deterrent, a role it owned for the next 10 years. With the Polaris submarine fleet taking over the nuclear deterrent mission in 1969 and multi role aircraft, such as the Tornado, muscling in on the its strategic bombing role in 1979, it was no surprise that by the outbreak of the Falklands War in 1992, Vulcan crews were already being given new assignments and the 30 year old aircraft itself had started to be withdrawn from service. 

With delta wings and skin plating that would cover a football pitch, the Vulcan was as impressive an aircraft to the RAF as Concord was to the commercial flying world. Indeed they even shared the same engines. I loved seeing this aircraft fly and have fond memories of it being one of the highlights of any airshow. I even have a picture on my office wall of the last airworthy Vulcan, XH558, making its final flight over the Lake District in October 2015. 

My last Airshow sighting of the Vulcan at Yeovilton, Summer 2013

Before repainting my Vulcan, as has become the norm for all my lockdown scale modelling projects, I undertook quite a bit of additional research to ensure I correctly reflected its Falklands War colour scheme. Although I would have followed Airfix's original colour painting instructions to the letter, and with that original model also looking to portray the famous Operation Black Buck Vulcan XM607, it is surprising how different my makeover model looks. Oh, and I'm not going to go into detail of what XM607 got up to, I will only say that when I read Roland White's book, Vulcan 607, I was blown away and if you want to know more, I highly recommend you read it, you will not be disappointed!

The colour scheme I discovered that I had applied to my original Vulcan dates back to that the RAF were using in the late 1960s. It would appear that the RAF moved from this dark grey & green to a lighter grey camouflage in the 1970s and it would have been this that XM607 would have been wearing in 1982. One could write a whole book on camouflage and I dare say I may have to have a go one day, but it is now clear to me that Airfix were using a 1960s colour chart for this aircraft, which although incorrect for  Operation Black Buck, it was quite OK for XM607 when it entered service with the RAF on New Years Day 1964. XM607 was withdrawn on 17 December 1982 to became a static exhibit alongside the Waddington runway. I've been fortunate enough to visit 2 other Vulcans on static display. XL360 which flew to its retirement location at Coventry on 4th February1983 and XJ823 which was on standby for Operation Black Buck and flew into Carlisle on 24th January 1983 to join Solway Air Museum's collection; they are truly amazing and intimidating aircraft! 


After the makeover, with a Harrier alongside for scale.

The Vulcan is such a large model that there is no way my runway and hanger will ever be able to accommodate it. I am definitely going to have to return XM607 to the air! In the above picture, I have also added a Hawker Siddeley Harrier for size. This is a later Harrier than those used in the Falklands War but I'll share more of that later in this project. 


-----

The Model


Brand: Airfix
Title: Avro Vulcan B Mk2
Number: 09002
Scale: 1:72
Released: 1995 | Rebox (Changed box only)


Friday 16 October 2020

Westland Wessex Mk1/31 anti-submarine helicopter

When I accepted the challenge to add helicopters to my Scale Modelling Projects, I had assumed I'd build a couple and then return to my favoured winged aircraft. It is therefore, a great surprise to me for this build to be my 6th helicopter and to have a further 4 in progress! 

Just as the First World War opened the military mind to the use of air power, the post war conflicts in Malaya, Borneo, Korea and Vietnam did the same for helicopters. If you've been following my builds, you'll have accompanied me through these early days of helicopter flight. My scale model builds of the Sycamore, Whirlwind, Sioux and Hueys have covered the years 1950-1975, and while my next model, the Westland Wessex, enters its finest hour in the early 1980s, it actually first saw service, replacing the Westland Whirlwind, in 1960.

The conflict of the 1980s, where helicopters proved undeniably critical to military success, was the 1982 Falklands War. When Argentina invaded the disputed and distant British territory in the South Atlantic - unknown by many at home at the time as the Falklands Islands and South Georgia - Britain was to undertake probably last and most audacious overseas military engagement of modern times. It was a conflict in which equally matched forces were to face each other in a fight for all out victory, the like of which we have not seen since.

The Wessex helicopters which participated in the Falklands War, were the improved variant of the Wessex Mk3/HAS3, which succeeded the 1960s Mk1 in the anti-submarine role, and the 'commando assault' variant, the Wessex Mk5/HU5, which was developed as a battlefield transportation helicopter. 2 Wessex Mk3s and 55 Mk5s were shipped out to the Falklands, which together with even newer Sea King, which I will cover in a later build, performed the vital role of moving troops and supplies between ships and across a battlefield unsuitable for vehicles.

Wessex Mk1/3/5? In commando assault Falklands War colours of 848 RNAS

There is currently no quality scale model company producing the Wessex as a 1/72 kit and so finding just one, if not the three that I have in mind for my Falklands War project, has been challenging to say the least! The first kit I was able to lay my hands on, at a sensible price, was a scale model of the original Mk1. While this variant had been replaced by the Mk3 some years before the Falklands War, it was visually similar to both the Mk3 and Mk5 with the exception of just two fundamental details: it lacked the Mk3’s radar dome and had a second exhaust jet to the Mk5’s single one. 

The model kit itself, although released in 2009 by the Russian manufacturer Ark Models, looks very dated, which is not surprising when one learns that it is basically Frog's 1963 kit re-released in Novo's 1970s box! Although production of most of Frog's kits passed to the Soviet Union manufacturer Novo in the 1970s, neither they nor Ark Models, the new owners, appear to have made any effort to improve the kit, and goodness, with the age of the tooling, it needs improving! 

One of the smallest kits I have constructed to date

With only around 21 individual pieces, this is one of the smaller kits I have constructed to date. The poor quality in moulding and fit required copious amounts of plastic filler, which at least gave me opportunity to practice this new modelling technique. While the model came with 2 figures, which made a nice change, the cockpit detail was woeful when compared to the real life helicopter and even some models produced in the larger scale. So I improvised adding scratch built control panels and a fire extinguisher. The after view look better in the 'flesh' than in the photos!


Before & after adding scratch built cabin 'furniture'

Once completed, I had to make the decision on colour scheme: blue/grey for the anti-submarine Mk3, or green for the commando assault Mk5. The finished build, irrespective of its Mk1 origins, was far too poor to have as a display model and after coincidentally locating both a Mk3 and Mk5 kit, the decision was easy; it would play a central role in a diorama depicting Royal Navy 845 Squadron commando Wessex helicopters in one of the key missions of the War. 

and ... my Wessex Mk1 more at home over the Borneo Jungle 1964!

More from the Falklands War next week.


Brand: Ark Models
Title: Westland Wessex HAS Mk.1/31 Anti-submarine helicopter
Number: 72032
Scale: 1:72
Released: 2009 (Originally 1963 Frog)

Thursday 8 October 2020

Operation Silver Bayonet Diorama

Drawing to a close my scale modelling visit to Vietnam, here are a few of the diorama features which, while not specifically referenced, may have been spotted in the pictures published over the last few weeks.

Vietnam Bicycle Troops

First up the bicycle troops, who will have been seen loitering in the background of the UH-1 Huey and M113 model shots. 

1/72 Scale Viet Minh Cycle Troops

For my cyclists, I used HaT's set of four WW2 Japanese bicycle infantry. In the absence of specific Viet Minh figures, the Japanese uniforms were a closer fit to how the Vietnamese regulars were dressing than a set of stormtrooper helmeted WW2 German soldiers which would have been the alternative! They also came with a great war pedigree; it's probably not well known that the dramatic way in which the Japanese troops advanced across Malaya to capture Singapore in 1942 was given the name of the “Bicycle Blitzkrieg” ... yes, they cycled into battle!

Bicycle Blitzkrieg

Being made of quite a soft and malleable plastic, and requiring a good deal of assembly, made this set quite a challenging and frustrating build, especially when considering the small part they eventually played in my diorama! Many of the soldiers arms were separate, as were the bikes' handlebars, and putting everything together such that it all matched up correctly was not as straight forward as it should have been. The general sculpting was good and the detail reasonably sharp but the proportions of the hands to the rest of the body on a couple of the troops seemed comically oversized; a feature of being designed to wrap around the handle bars. The bikes, were also nicely detailed and, with pedals and chain, all to scale.

 HaT's set of four WW2 Japanese bicycle infantry

I felt I had to include bicycles in my diorama because they were so dominant in maintaining the Viet Minh’s supply lines which, despite the unprecedented and prolonged bombing campaign by the US, were kept open using what is now recognised to have been the largest military bicycle-transport operation in history. To put this into context, between 1964 to 1973, the US conducted 580,000 bombing missions, dropping more than two million tons of ordnance on the Ho Chi Minh trail. This equates to a single aircraft dropping it's bomb load every 8 minutes, 24-hours a day, for 9 years! Although the Vietnamese dodged the bombs running 600 Russian-made Molotova 2.5-ton trucks as well as sampans, ponies and some 200,000 porters along the Trail, the mainstay of their logistical network was composed of 60,000 resilient bicycle-pushing men and women. In their fight, first against the French and then the US, the Vietnamese favoured, not unsurprisingly considering their colonial history, the French-made Peugeot bicycle, with the Czech-built Favorit their next bike of choice. 

With their large carrying capacity, bicycles were particularly effective on Vietnam’s narrow roads and tracks in the dry season, and easily modified to carry large loads. 

Bicycles on the Ho Chi Minh trail

In addition to transporting men and supplies, the bicycle served the needs of the wounded on the battlefield. In 1968 a Peugeot subsidiary produced a model especially for the North Vietnamese Army that contained surgical and medical kits and two headlights, with detachable extension cables for lighting a small field hospital. And a rudimentary form of medevac was devised using two bikes lashed together with long bamboo poles from which one or two stretchers could be suspended!

Interesting cycling factoid, Škoda, the Czech car manufacturer, started making bicycles in 1895 and still are, and made their first Škoda Favorit in 1936. Although nothing to do with the Favorit bike manufacturer which has roots back to 1922, and yes also still makes bikes, I found it sufficiently interesting to share. 


Soviet 37mm 61-K Anti-Aircraft Gun

North Vietnam’s light anti-aircraft artillery units were widely deployed and downed more American planes and helicopters than all other North Vietnamese weapons systems combined. American airmen flying over North Vietnam faced one of the most intensive and highly developed air defence systems in history and although the North’s fighter planes and its surface-to-air missiles (SAMs) got the headlines, it was the light anti-aircraft guns that inflicted the heaviest losses. North Vietnam deployed more than 8,000 anti-aircraft guns around key targets throughout the country, inflicting more than 75 percent of aircraft  combat losses. 

North Vietnam’s light anti-aircraft artillery unit

The model I selected to engage the Huey gunship in my diorama was the Soviet 37mm anti-aircraft gun, aptly produced by the Russian scale model maker,  Zvezda! This was a very crisp and well moulded kit, uniquely having all its parts clipping together and requiring no glue! I loved it.

Introduced in 1938 the 61-K was the Soviet Union’s primary anti-aircraft gun of World War II. It was based on the Swedish Bofors which the navy had purchased back in 1933. Competitive firing trials conducted in 1940 between the 61-K and the Bofors 40 mm, then being used widely by the British and its allies, found no substantial differences between them. 61-K was also made under licence by the Chinese and subsequently the new Socialist Republic of Vietnam, and went on being produced until the 1980s. 


North Vietnam reportedly deployed more than 8,000 anti-aircraft guns for air defence during the war, the majority of which being acquired direct from the Soviet Union and the remainder from China. Those located in Cambodia and South Vietnam were committed primarily against helicopters ... so my diorama is quite accurate in its portrayal of Huey gunship versus the 61-K anti-aircraft gun. 

Huey gunship versus the 61-K anti-aircraft gun


Soviet 37mm 61-K Anti-Aircraft Gun


Other Accessories & Features

I couldn't have a Vietnam War scene without a paddy field and so a small water filled area with grass like vegetation was created at the edge of the diorama. I had originally intended for this to play a larger part of the battle scene but a 'walk-on role' was all that was left after the rushes were cleared away! 


Paddy field and sandbags

In the middle distance of the above pictures you will also be able to make out sand bag protection around a slit trench. A set of these sandbags were provide within the Operation Silver Bayonet kit together with a number modelled into a wall which I used in the M48 Patton Tank diorama of the Camp Holloway helicopter base attack ... see additional picture below. 

You'll also see in this picture the watchtower, guard post and stores building also included in the kit. The signs were scratch built from actual photos of the base signage and the barbed wire was a late edition to complete the scene. If you look carefully, you'll also see a shot of the Westland Whirlwind, which has dropped in on Camp Holloway from Malaya! Although you may have seen this type of helicopter in Vietnam, it would, however, have been in the guise of the original US version, the Sikorsky H-19 Chickasaw, as no British piloted aircraft took part in the Vietnam conflict.

More sandbags, barbed wire, military buildings and scratch built signage 

Returning our attention to sandbags, in the 'drone shot' below of Operation Silver Bayonet you'll see an additional horseshoe shaped set of separately acquired resin sandbags, giving shelter to the troops protecting the anti-aircraft gun. 

The drone view of Operation Silver Bayonet

For trees I used a mix of palm and deciduous, both from UK manufacturers. The palm trees needed a lot of recolouring, and I even suspect that the maker of these could very well have been working from both a black and white photo and a palette of primary colours! Thinking of my carbon footprint, I did not, however, want to further outsource my supply to China, even though their tree illustrations looked fantastic. The deciduous trees were sufficiently nondescript to fit into a jungle environment, perhaps, I like to think, looking just like the rubber trees found growing in this part of the world!

Red earth, also typical of the region, was, as in my earlier MASH diorama, sourced from a local Jurassic cliff fall. The larger lumps worked well as stone for the walls and the finer grains for the dusty paths cut through the shrub. The red glow effect, to portray fire and exploding ordinance, were supplied by a set of rear bicycle lights ... another apt addition to the diorama, considering where we came in!

Thursday 1 October 2020

M113 A1 Armoured Personnel Carrier

My final scale model build from Italeri's Operation Silver Bayonet multi kit, and the last of my Vietnam series, is the M113 A1 ACAV armoured personnel carrier. This model, first released by Italeri in 2003, was included in this multi kit together with two other models from the early 2000s, the M48 Patton tank and UH-1 Huey helicopters.  I do wonder whether this was a lean period in Italeri's scale model production, for the quality of their earlier 1990s H-1 Souix and later 2010 UH-1 Huey are far better. The cynic in me could also assume that Italeri have lowered the quality of these re-released models just to keep the cost of their multi kits down. I guess I'm just going to have to try out a few more of these themed kits to find out! 

The nice key features of this kit were the range of alternative gun mountings, the option to have doors and hatches opened and the solid tracks, which I much prefer over the rubber band version. The decals were also the most spectacular I have seen on any but the most flamboyant military model. So much so, that when all 3 were applied to the sides, I had visions of Lydia The Tattooed Lady! As such, I removed the most garish and added one to the front, an area I have frequently seen decorated with motifs, even grimacing sharks teeth! As with all Italeri models, there were no crew or combat figures, but with around 50 US troops included as part of the multi-kit, I had plenty of options to play with! I, therefore, placed the M113 straight into the thick of the battle, with .50-caliber machine gun firing and troops spilling from its bowels into action! 

The M113 armored personnel carrier, second only to the UH-1 Huey helicopter in battlefield importance, entered production in April 1960. Developed by FMC, the fully tracked, aluminium-hulled M113 was configured for a two-man crew of a commander/gunner and driver, and could carry an additional 11 soldiers. It included a hydraulically operated rear ramp for rapid exit, as seen on my model in the down position. The ramp also had a hatch for access when it was up.

M113 engages the enemy with it's .50 machine gun while troops exit  

Enhancements included protective steel plates welded to the commander’s cupola or the .50-caliber M2 machine gun mount; which is the configuration you'll see adopted on my model. Additionally, many units mounted one or two M60 machine guns next to the roof cargo hatch, an enhancement I left off as it looked just too busy!  Over time, the improvised armour protecting the machine gunners evolved into rotating gun shields providing all-around protection; another enhancement I left off as they were a later 1970s addition  and my M113 is playing a role from 1965. 

Example of protective steel plates welded to the .50-caliber machine gun mount

The M113's combat specialism was breaking through heavy thickets in the midst of the jungle to attack and overrun enemy positions. Danger Close, the 2019 film about the Battle of Long Tan, as recommended to me by a good friend when learning of my little project, not only educated me of the Australian involvement in Vietnam but also showed some great scenes of the M113 used in just such a way. Although the M113 gets a small 'roll-on' part at the end of Platoon, in Danger Close it gets a rare staring role. 

Hydraulically operated rear ramp lowered for rapid exit

While Australia and New Zealand felt the need to support the US in this futile war, may be because this perceived Far Eastern Communist threat was seen to be too close for comfort, I’m proud to say that Britain’s special relationship with the US failed to sway the then Labour PM, Harold Wilson, to follow suit. Unlike future pretenders, Wilson fought against immense US pressure to follow them into the abyss! I read two interesting quotes in Max Hastings’ book Vietnam: An Epic History of a Divisive War 1945-1975, of McNamara, US Secretary of Defense, saying that he would pay a billion dollars for a British brigade, to which Wilson deflected the request saying that 'the Queen’s soldiers had their hands full in Asia addressing Indonesian aggression towards Borneo and Malaysia' (the subject of a couple of earlier lockdown builds); and Dean Rusk, the then US Secretary of State, is reported to have said, with considerable bitterness, ‘When the Russians invade Sussex, don’t expect us to come and help you’! There was obviously definitely no love lost within our special relationship at the time!

Next week .. The Falklands, a war that could so easily have been mine.

----
The model

Brand: Italeri
Title: M113 A1 ACAV
Number: 7011
Scale: 1:72
Released: 2005 


Ice Cold In Alex "Katy"

My third Airfix Austin K2 Ambulance build, I just love this kit. This one is inspired by the 1950s classic book and film “Ice Cold In Alex”....